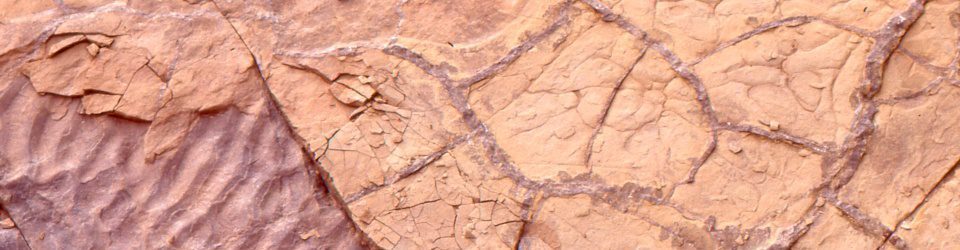
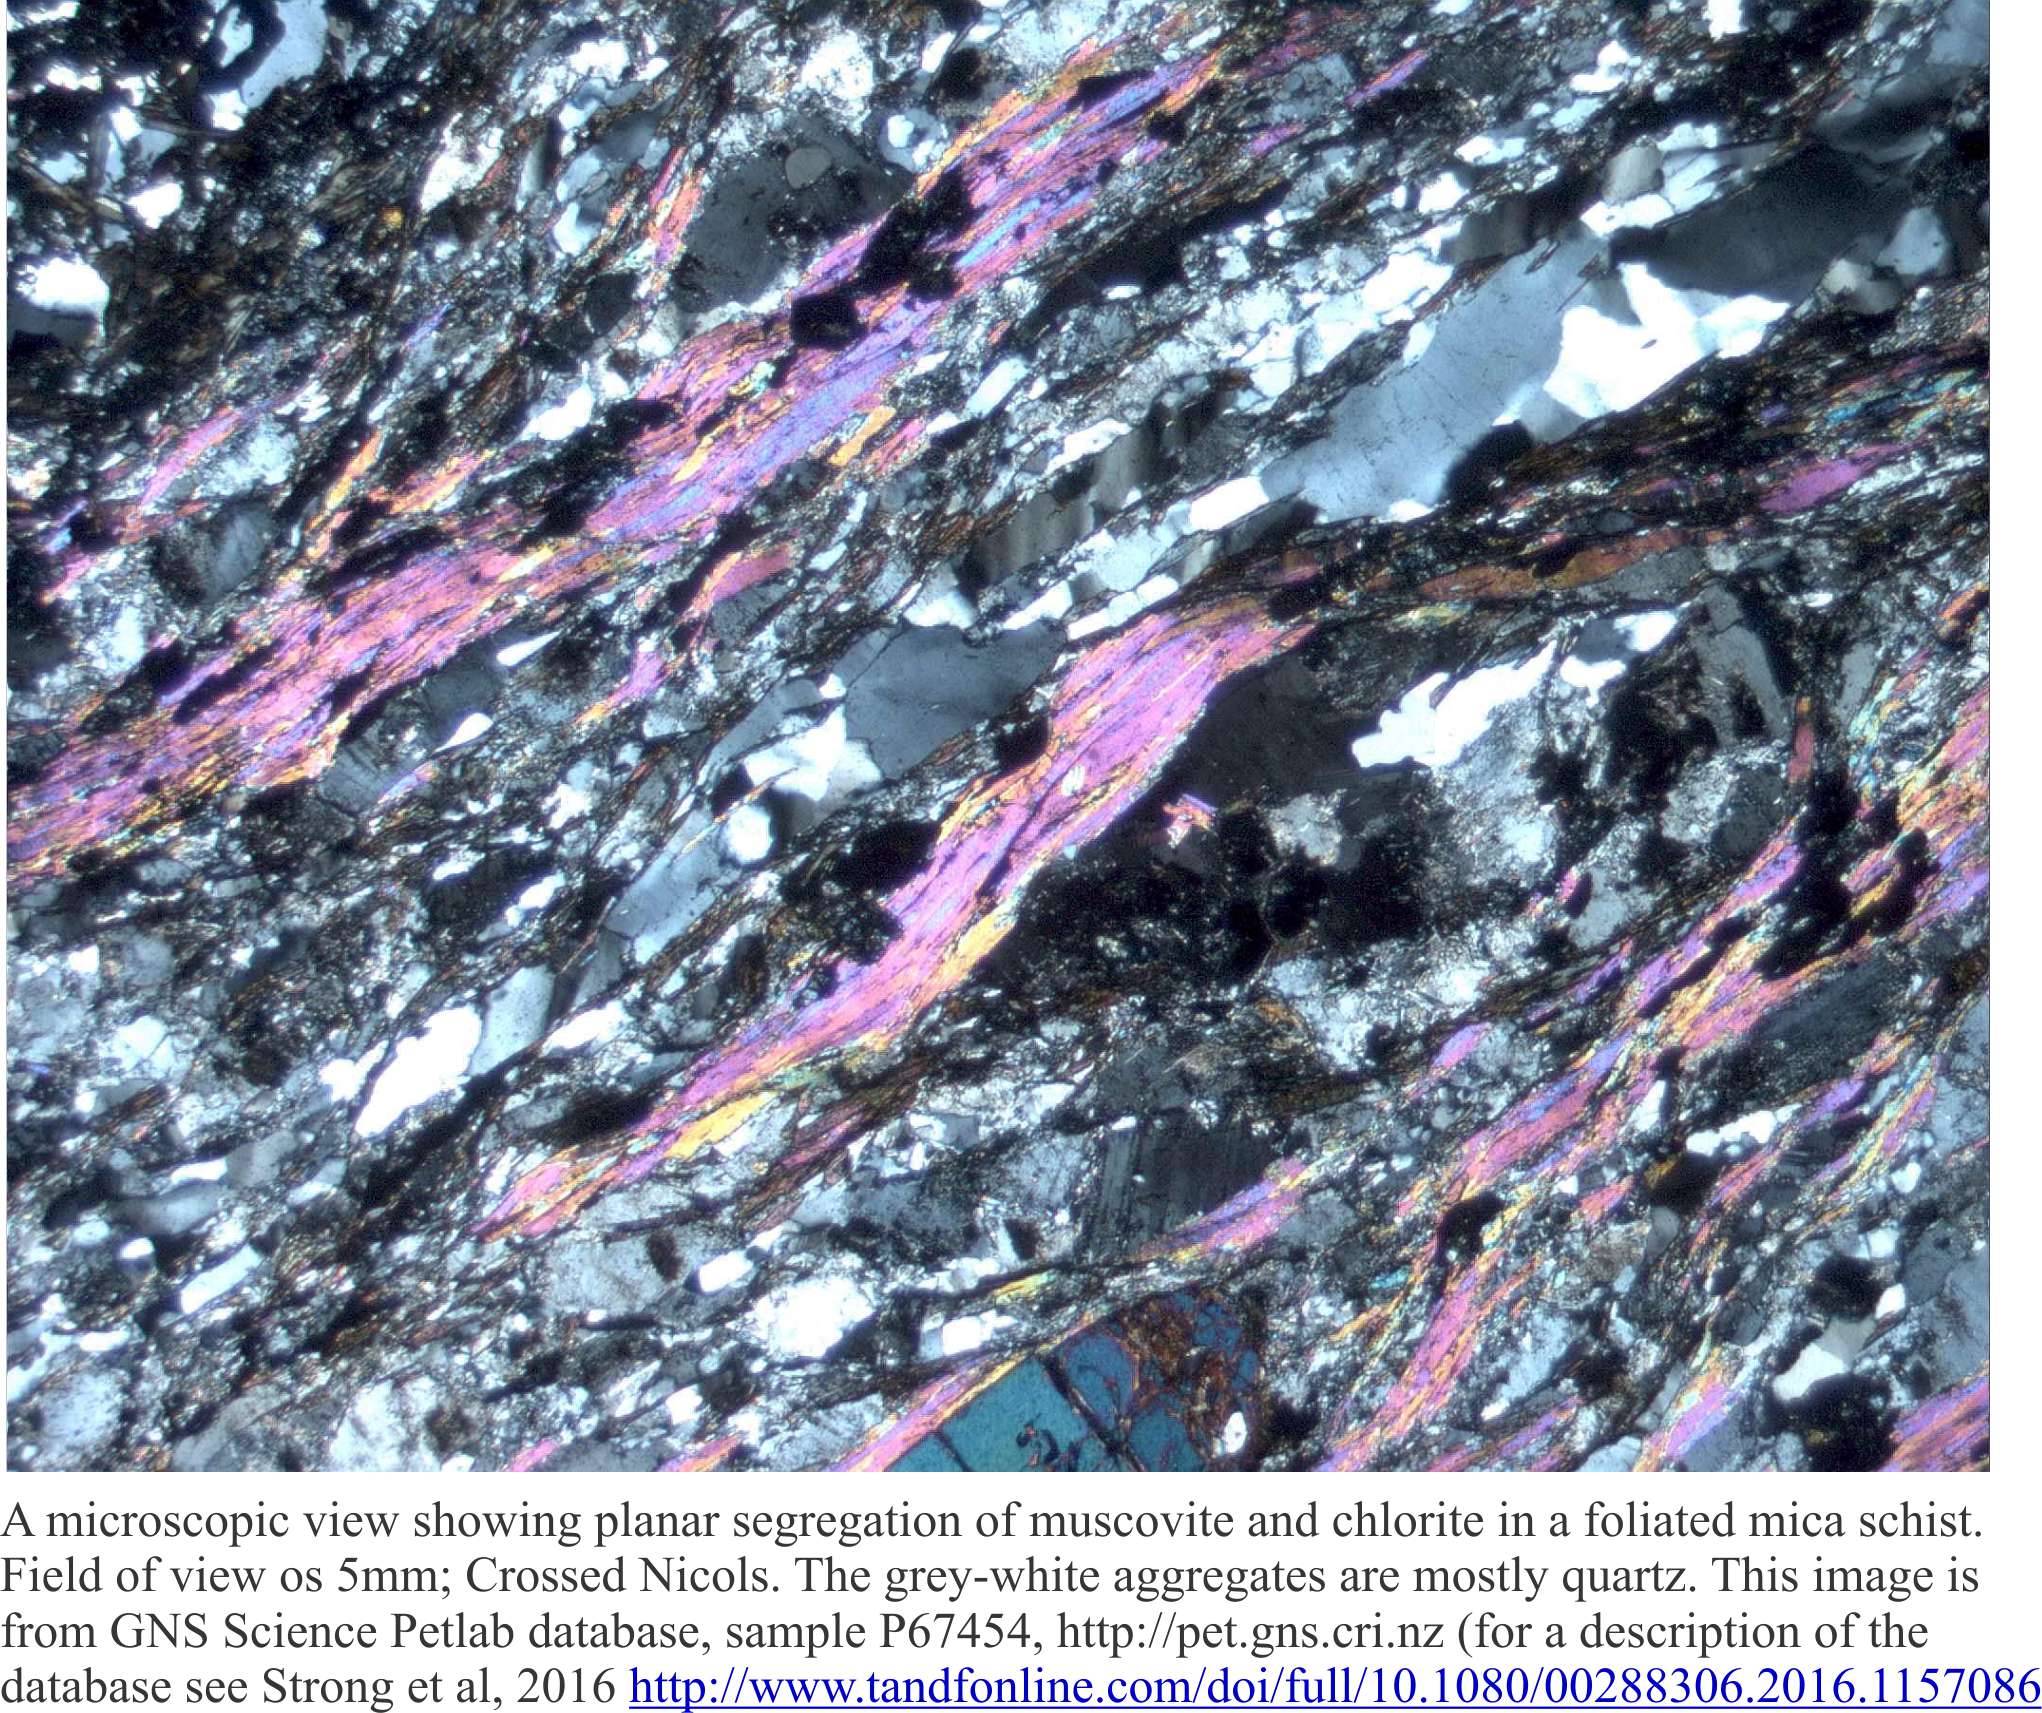
Cleavage is a fabric. It is a close, regularly spaced planar to curviplanar foliation. The term ‘cleavage’ derives from its propensity to split apart or cleave. Where cleavage is developed it is pervasive at both macroscopic (outcrop, regional map scale) and microscopic scales (thin section); in other words, it is a penetrative fabric. It is most commonly found in folded rocks that have been subjected to some degree of metamorphism – from relatively low-rank slate (slaty cleavage), to beautifully foliated schist.
Cleavage is the product of shortening and to some extent a reduction in rock volume by dissolution during folding and metamorphism. Cleavage planes are defined by an alignment of micas (hence the ability to cleave) that grow as other more labile minerals (e.g. clays, particularly illite) are recrystallized. The growth of mica crystals and progressive development of cleavage go hand in hand.
There is no void space between cleavage planes and although they are mechanically weak, the rock is continuous. Hence, cleavage differs fundamentally from joints. Joints also are regularly spaced, commonly pervasive planar structures, but they form by extension and brittle failure of a rock mass. This process results in void space, or fracture porosity that during burial will become the locus for precipitation of minerals such as calcite and quartz.
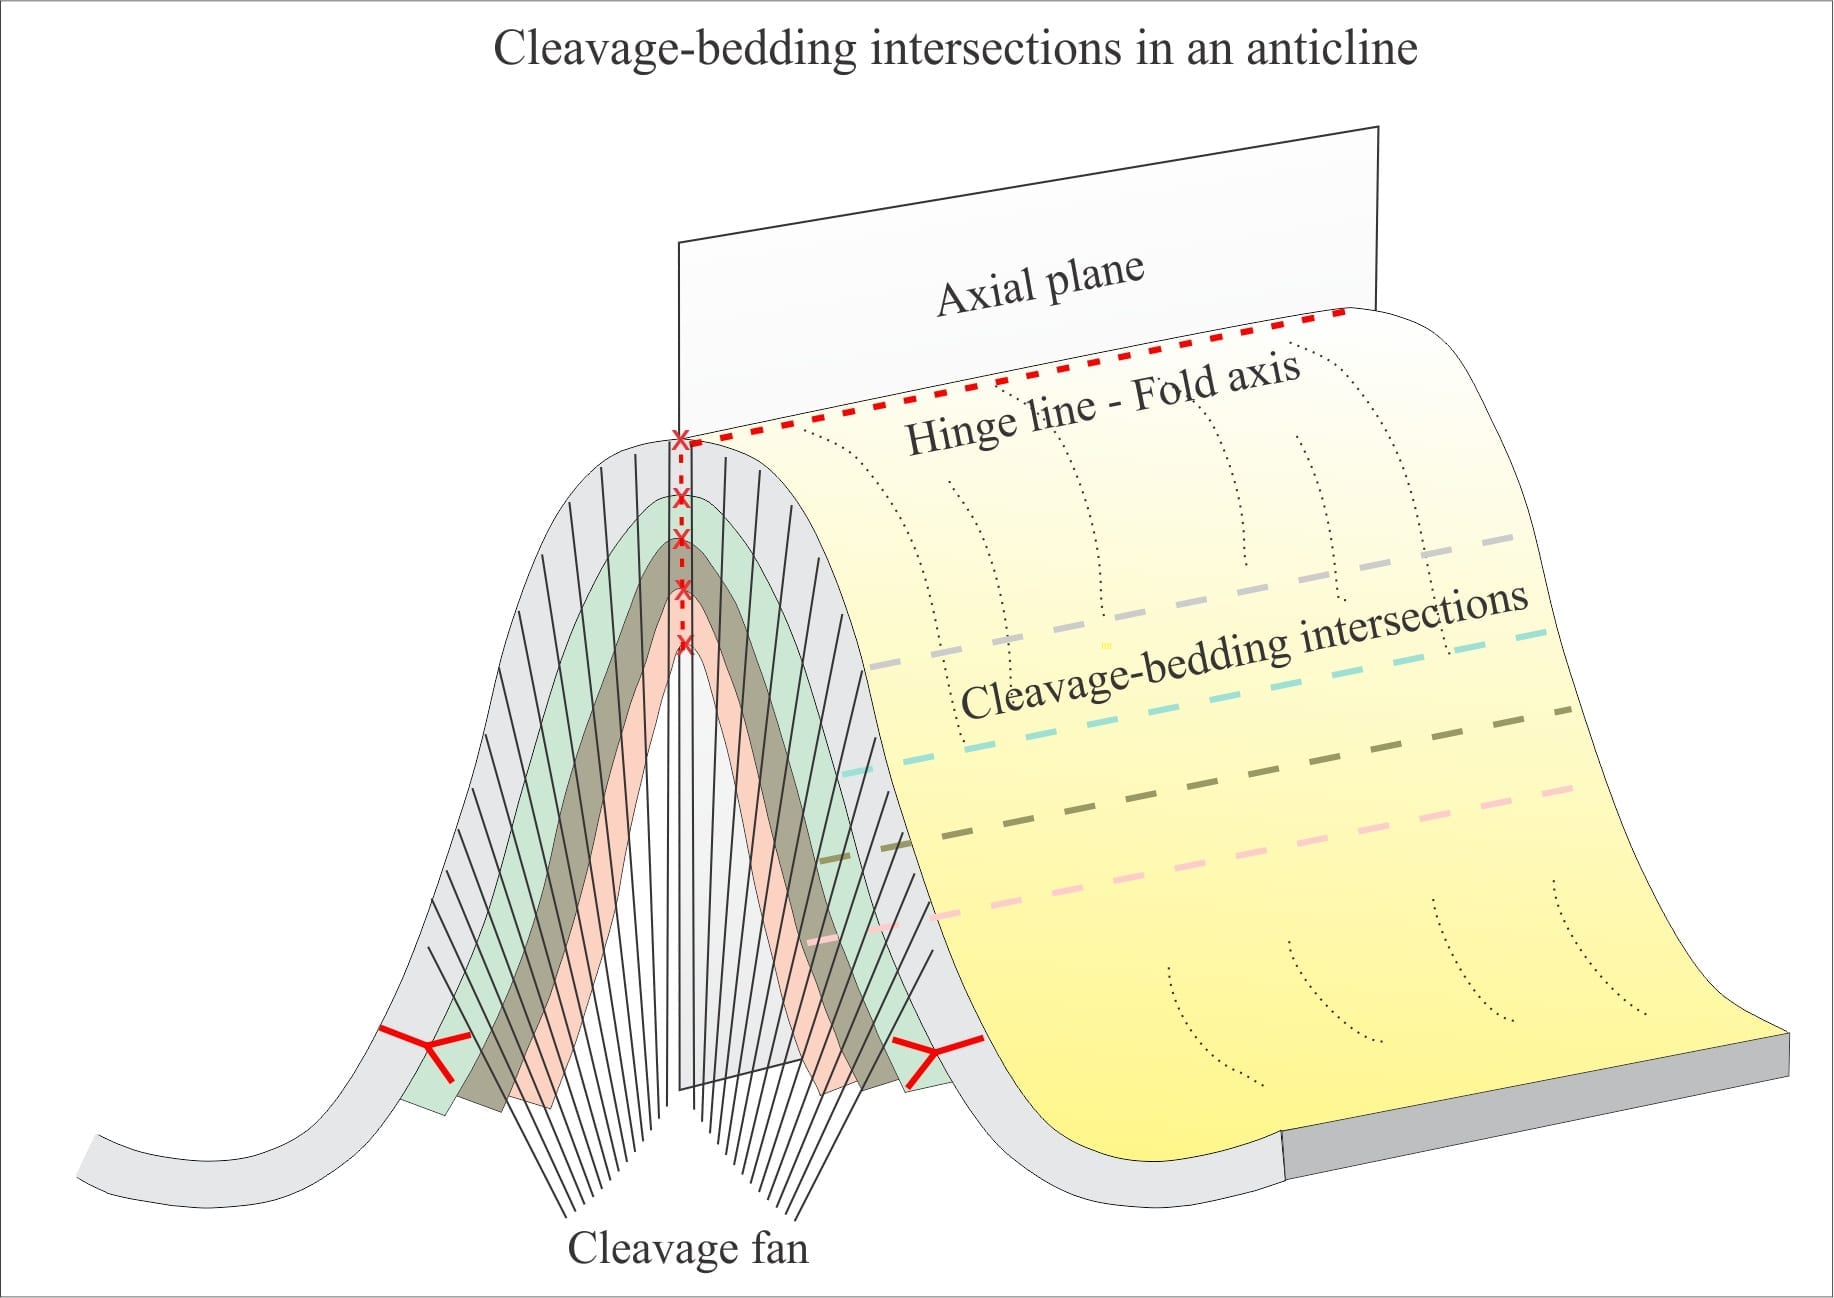
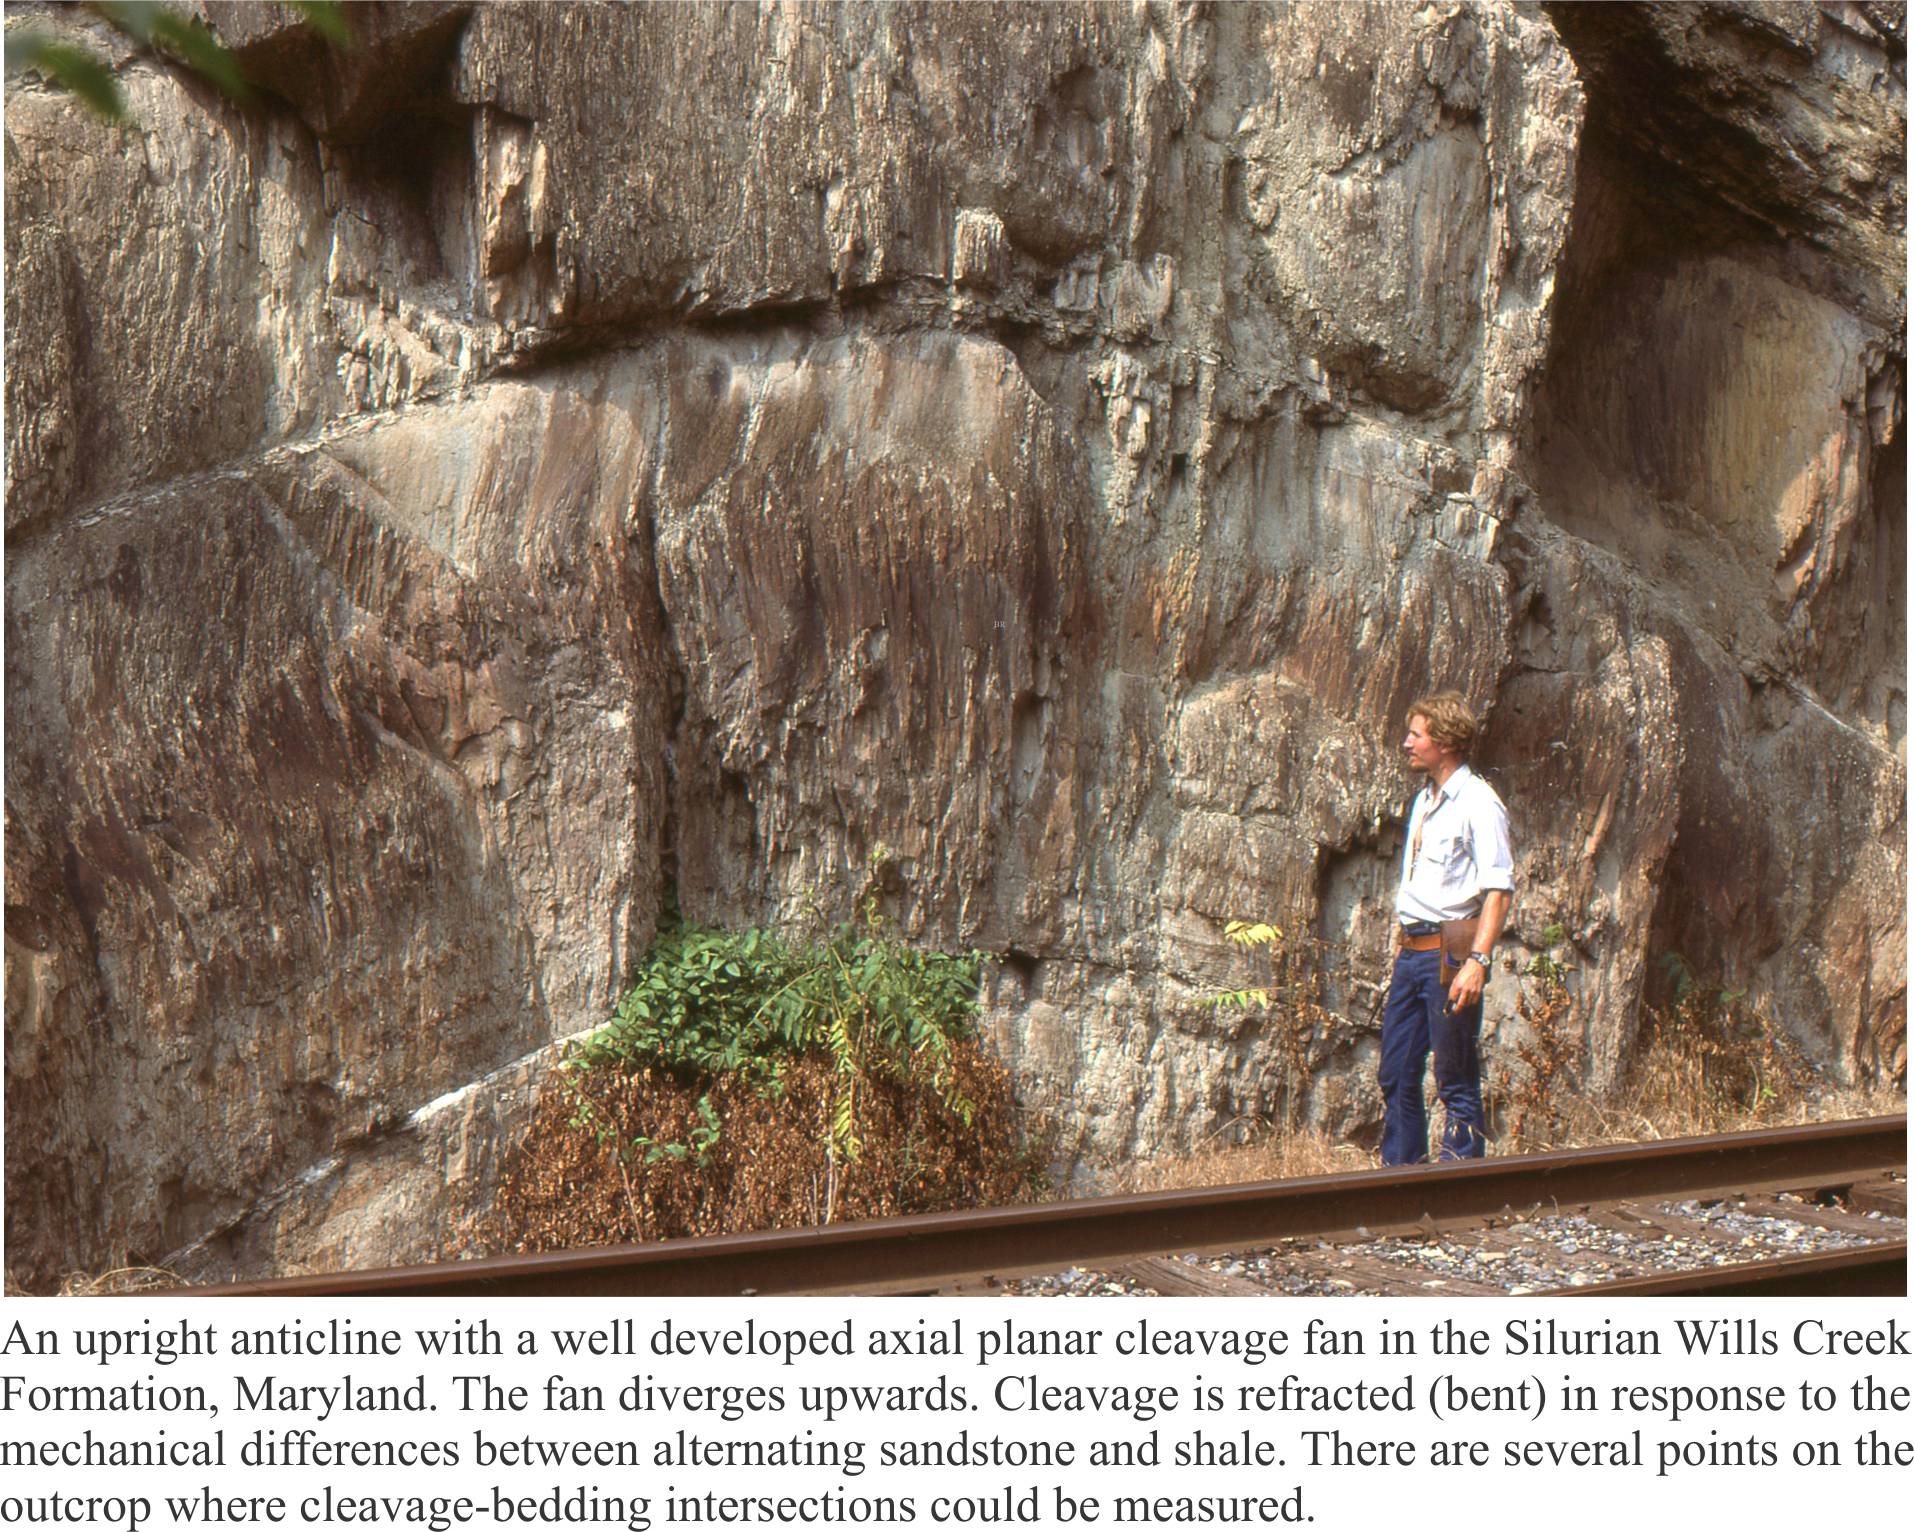
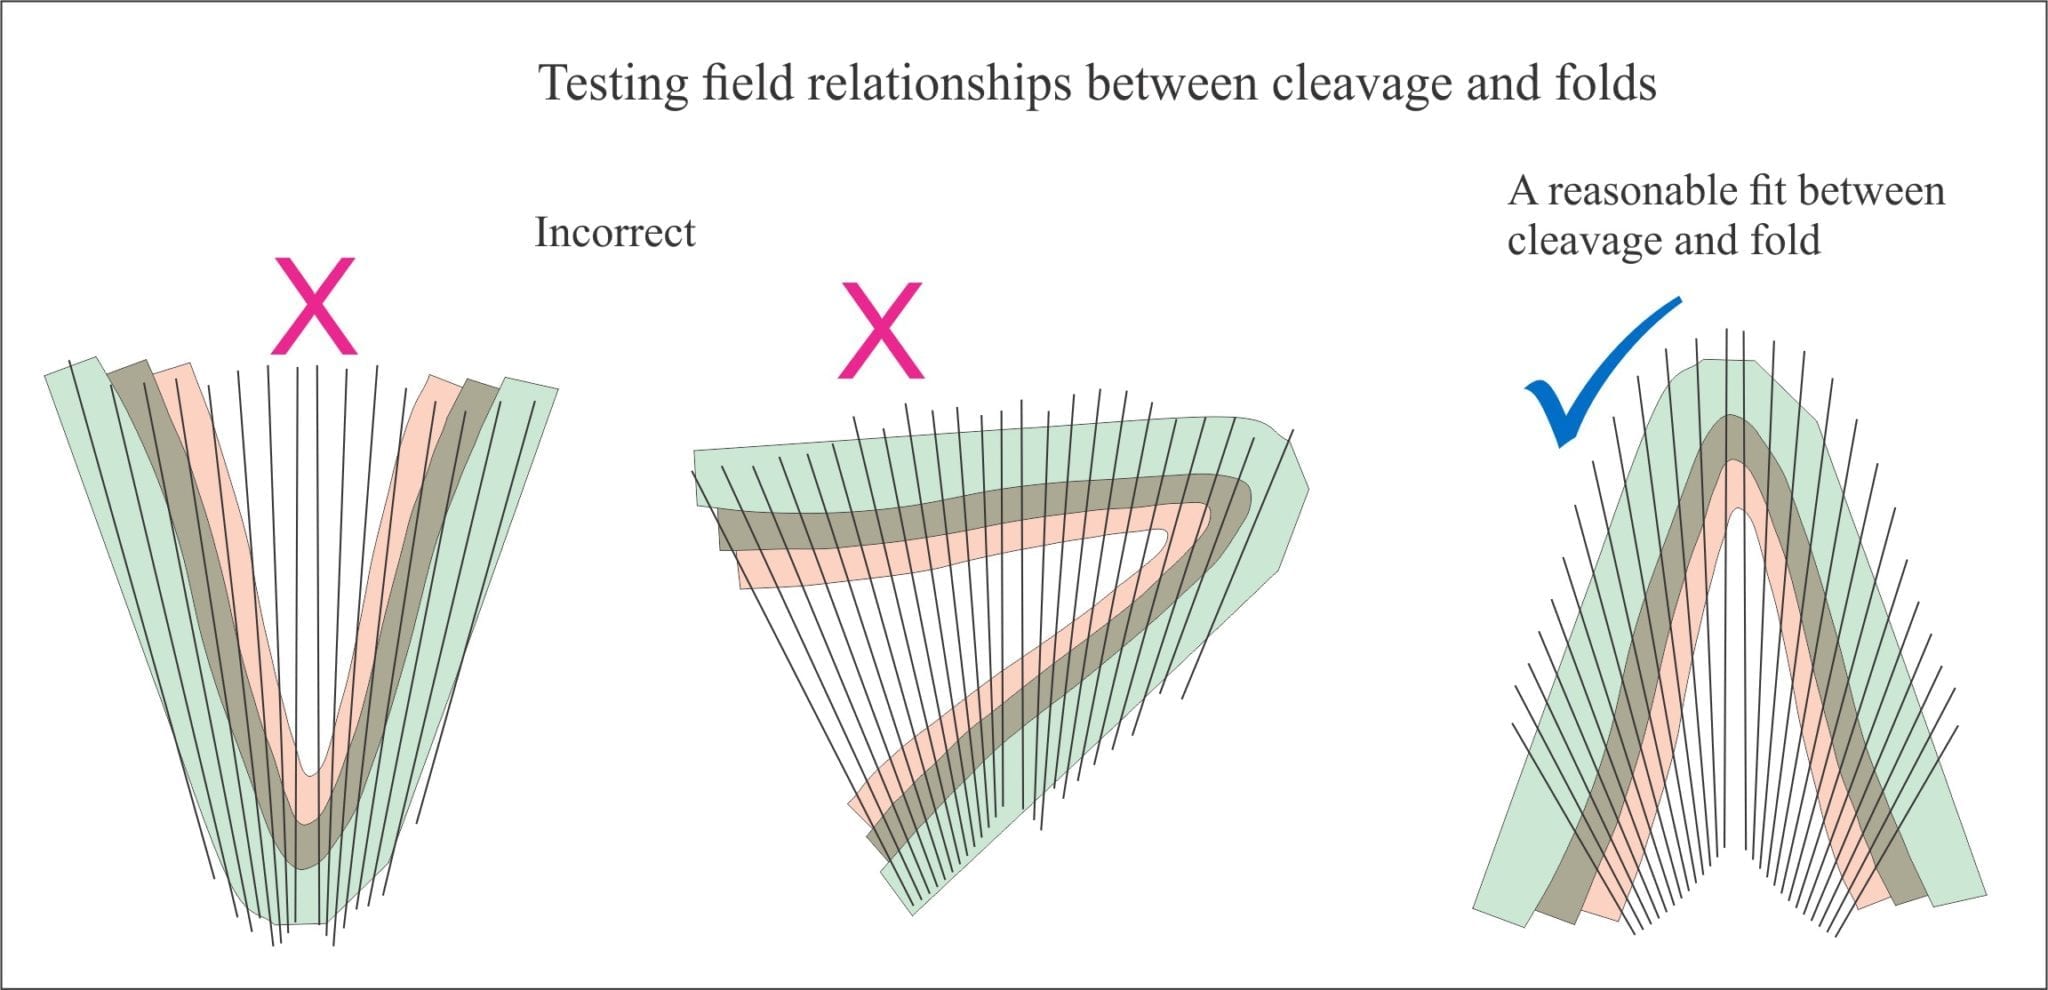
Cleavage has a geometric relationship with folds. Arrays of cleavage are commonly arranged as fans about axial surfaces and in tight folds cleavage closely parallels axial surfaces. Both cases are referred to as axial planar cleavage. Fans diverge upwards in anticlines and converge upwards in synclines. This relationship furnishes us with yet another tool for deciphering fold type and fold orientation.
The intersection of a cleavage plane with bedding creates a lineation that is parallel to the fold axis. We can measure its trend and plunge.
In upright folds, cleavage planes have dips steeper than bedding. Cleavage plane dip in overturned and recumbent folds may be less than bedding dips – if you observe this geometric relationship in outcrop then consider the possibility that the folds are overturned (S and Z parasitic fold orientation will be useful in this regard).
Cleavage geometry can be used to determine the facing direction of beds such that we can go beyond an antiform-synform description and identify more specifically anticlines and synclines. A simple example is shown in the cartoon below.
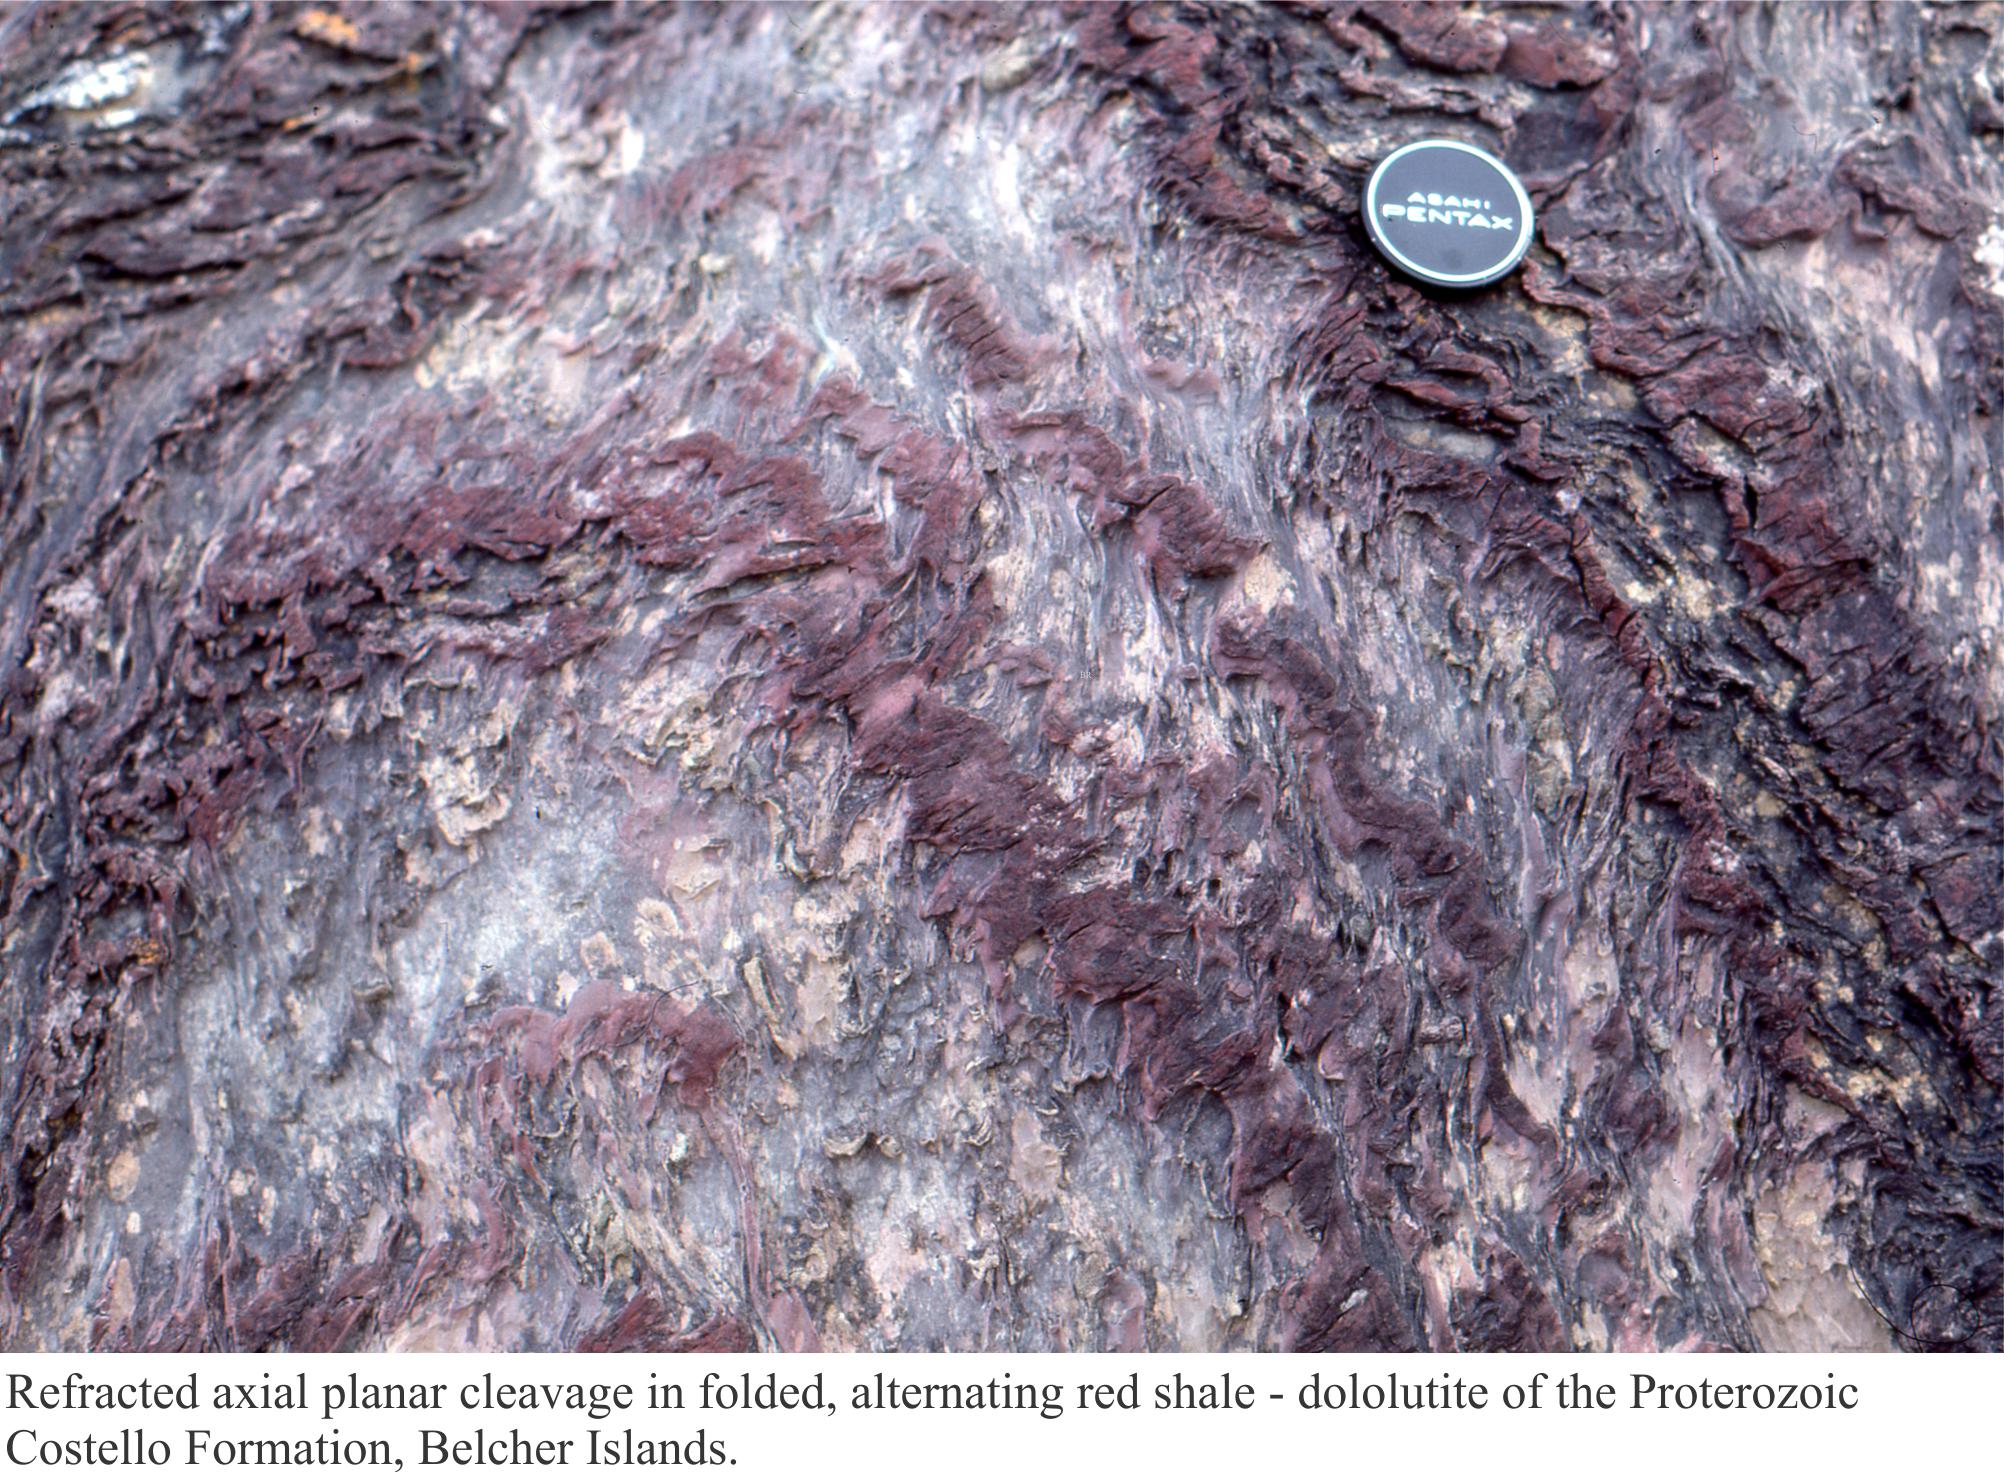
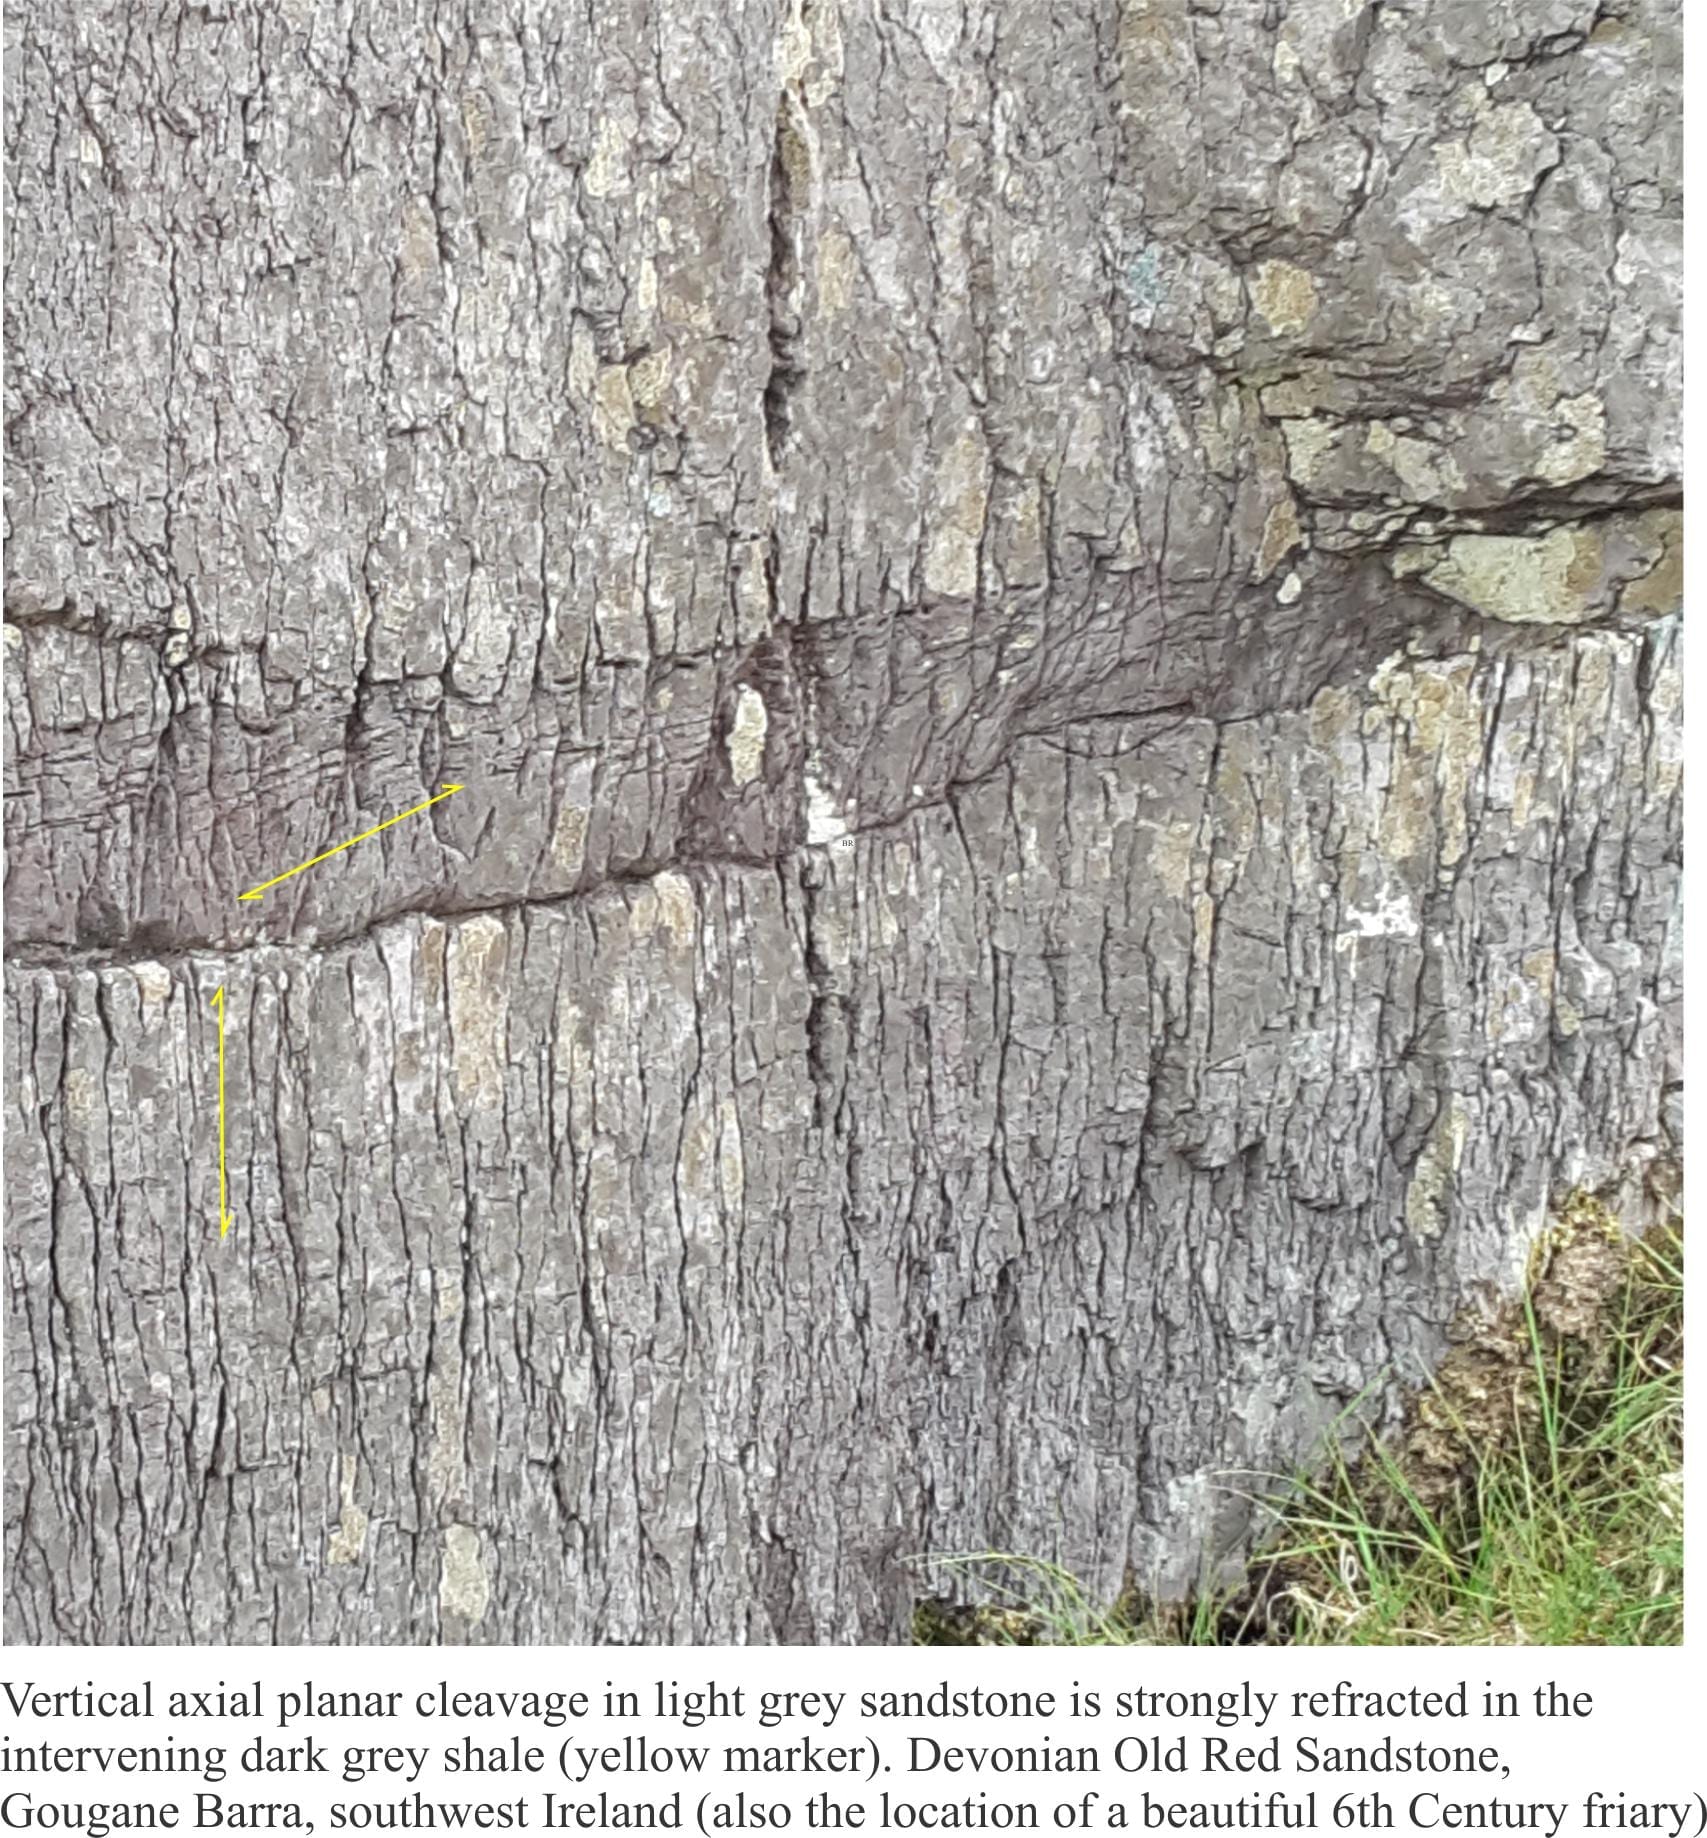
Cleavage is not always uniformly planar. In layered successions cleavage planes are commonly refracted or bent. The change in orientation reflects how different lithologies respond to stress; common examples of cleavage refraction occur in successions of alternating sandstone (mechanically strong) and shale (mechanically weaker). A couple of examples are shown below.
Next to measuring dips and strikes, this is probably the most important task you will undertake as a field geologist working in sedimentary rocks (and I include well-site stratigraphy in the general term “field work”). Stratigraphic sections provide you with:
the boundaries of rock units (formations, stratigraphic sequences, cycles, sedimentary facies).
The age of rock units (using fossils and other dateable rock or mineral components).
The presence of hiatuses such as unconformities and disconformities.
The vertical extent of depositional units and if adjacent sections are available, the lateral extent of these units.
The juxtaposition of depositional units (facies, depositional systems) based on bed thickness, composition, sedimentary structures, fossils.
Stratigraphic trends such as fining upward successions.
Nearly all sedimentary rocks occur within much larger and grander sedimentary basins; your stratigraphic section is a sample of that basin. Stratigraphic sections added piece by piece, like a jigsaw puzzle, will give you a more complete picture of the basin.
“What is your weapon of choice, Master Baggins?”
For this task you will need (in addition to all the other stuff, like a hammer, boots and lunch):
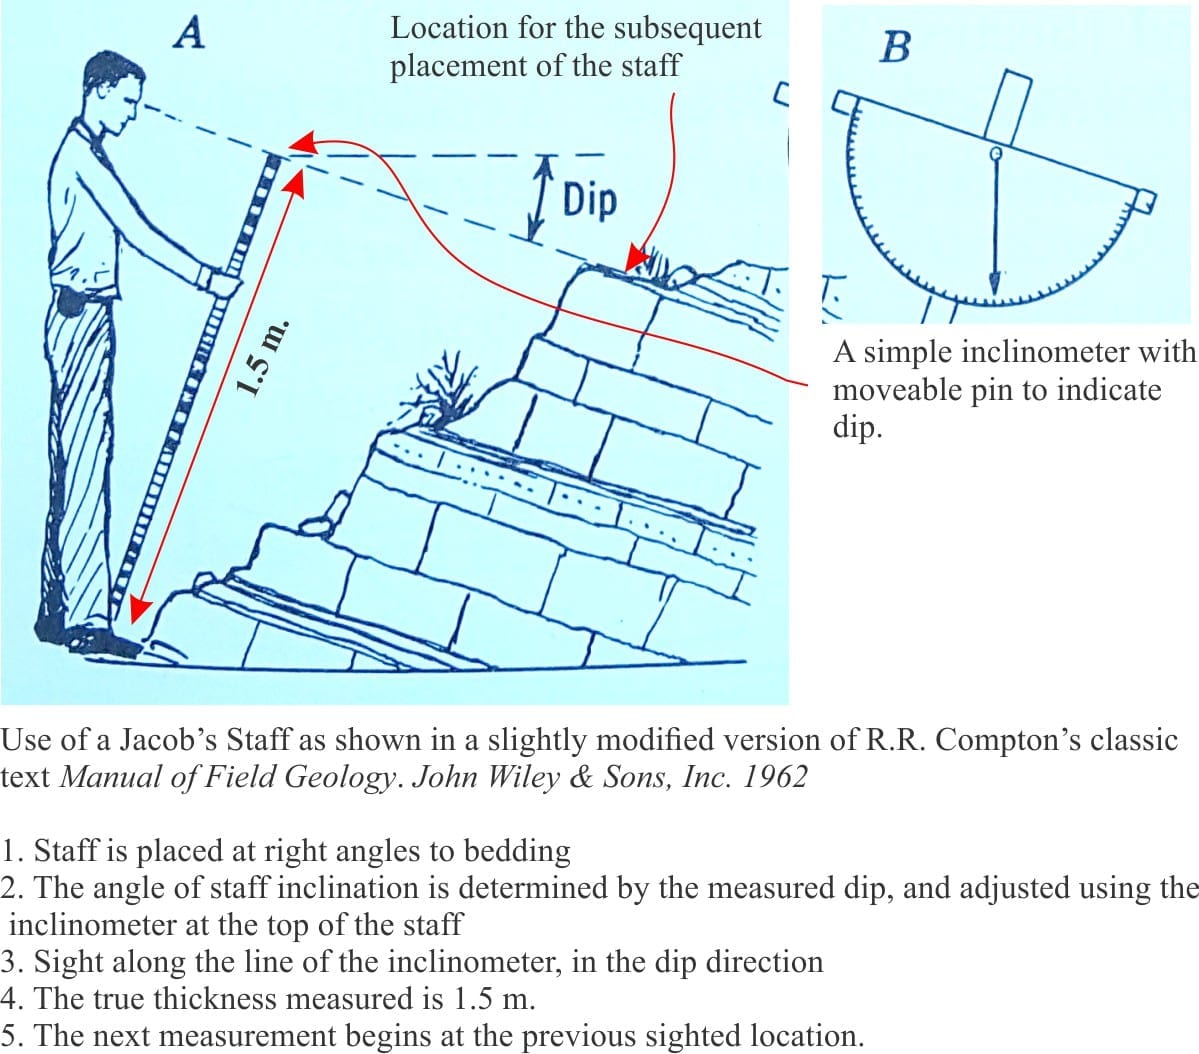
Jacob’s Staff; 1.5 m is a good length, marked off in 10 cm or finer increments. Make sure it has a decent inclinometer and bubble level attached with a lock-nut so that it doesn’t fall off (if it does fall off it is bound to drop into a crevice or down a cliff). The inclinometer is set at the local dip (that you have already measured). This is one of the best pieces of equipment ever invented – it dates to the 14th century where it was used for geographic and astronomical measurements. It allows you to measure true bed thickness directly. Check the dip regularly.
A tape measure (if you cannot find or make a Jacob’s Staff); a tape measure is useful for measuring the thickness of thin beds and crossbeds. You will need to correct each measurement for dip.
A compass for strikes, dips , paleocurrentmeasurements, and structural attributes, The compass inclinometer can also be used on the Jacob’s Staff.
Topography maps at a scale suited to the task at hand, depending on the scale of your section and the scope of your field mapping. And, if you can get them, vertical aerial photographs; satellite images may also work, again depending on the scale of your project (e.g. LANDSAT).
Water-proof field note book and more than one pencil, and a dry-bag to put them in. It is a good idea to have one of these even if you use a digital notebook-tablet – this kind of redundancy is recommended because there WILL BE accidents with your field notes and maps. An umbrella may look foolish, but I assure you they come in handy – particularly those wrap-around bubble types.
Camera. Take lots of photos.
Health and safety
Most teaching and research institutions, and companies actively involved in field work will have an exhaustive list of potential hazards and safety concerns. The relevant safety issues will depend on the type of terrain you are working in, weather conditions, wild life, the degree of isolation (are you going out for the day or an extended period?), communications (are mobile phone, satellite, or radio communications available), mode of transport, personal health concerns (are you allergic to bee stings, snake bites, crocodiles?). If your access to outcrops is via boats, or your field site begins on the sea floor, there will be an additional set of safety requirements such as life jackets, water conditions, tides, marine weather reports, ports of refuge, spare engines and fuel. All these potential hazards and health issues need to be assessed before field work begins.
Before you start
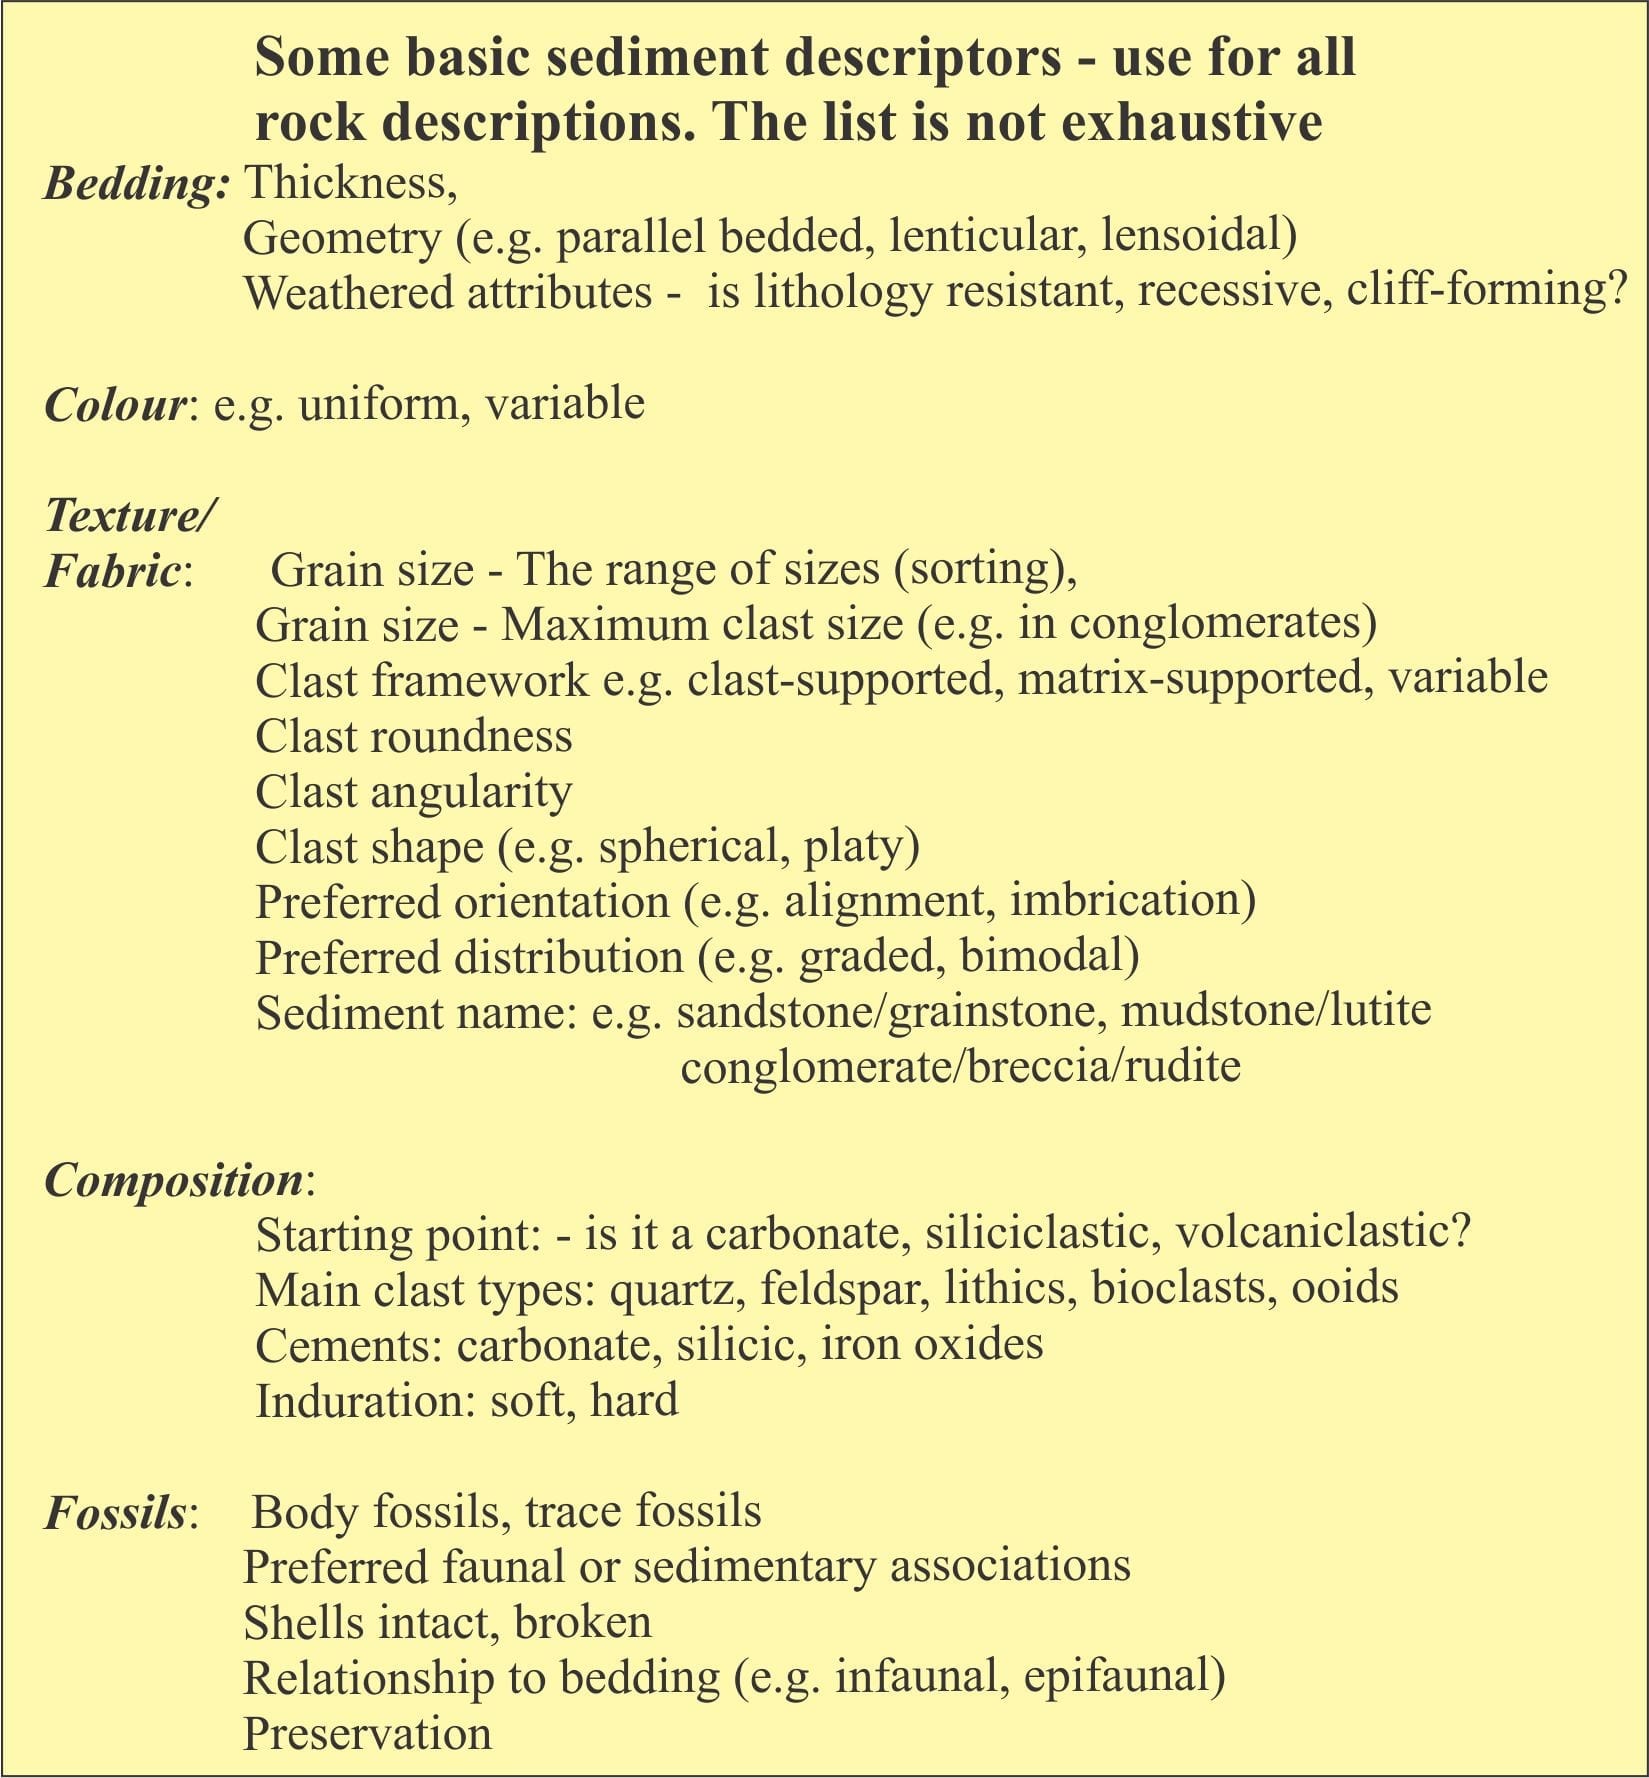
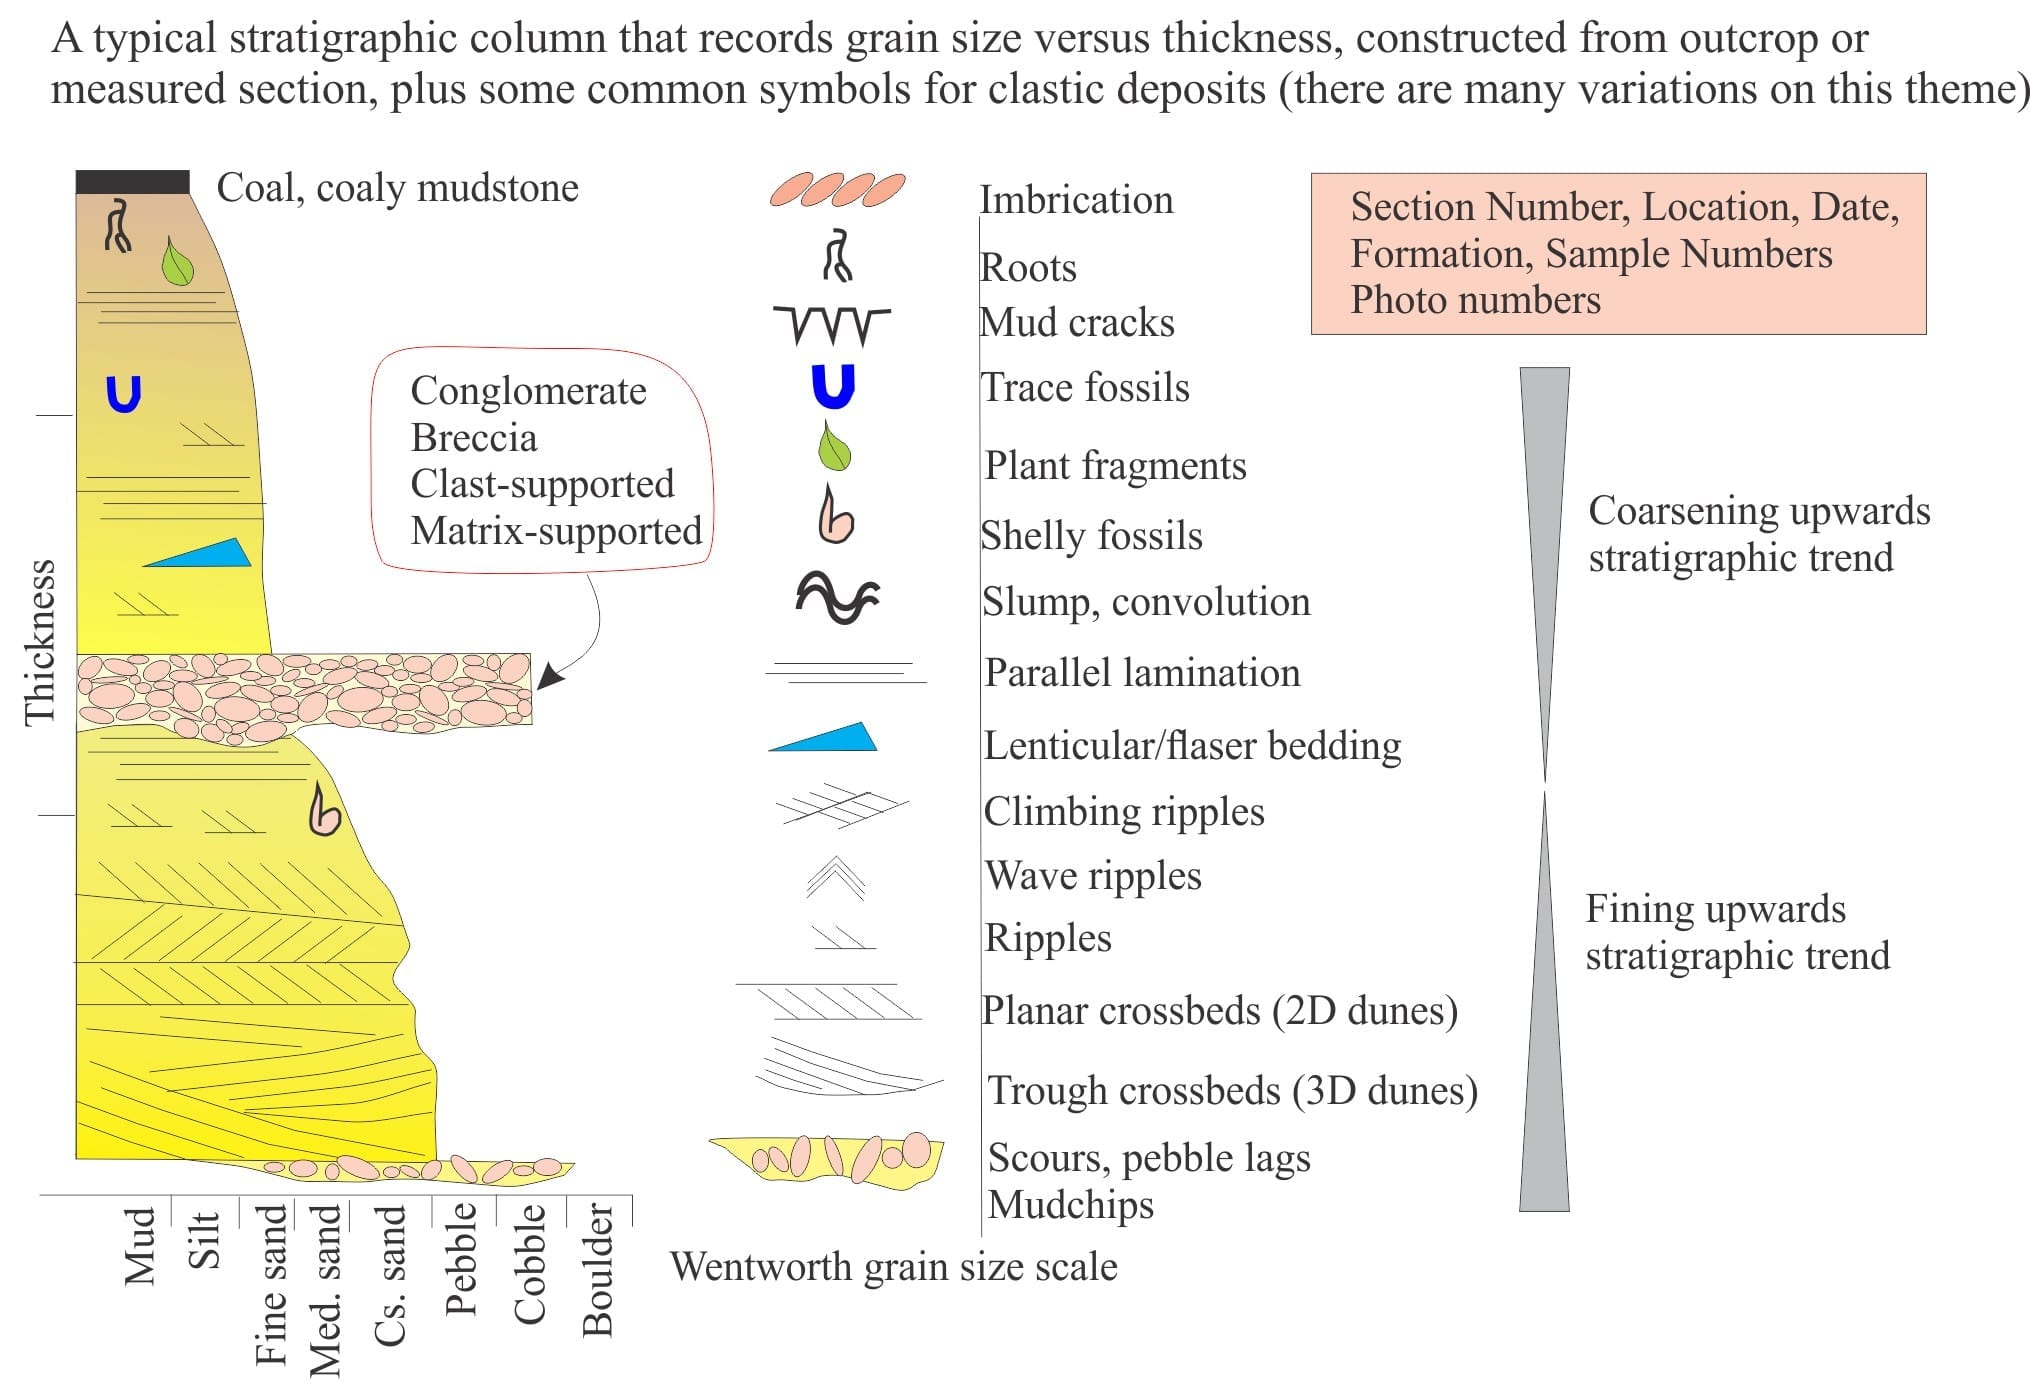
The following two diagrams list some basic sediment descriptors and terminology. These are your starting points for describing and interpreting sedimentary rocks and sedimentary structures in outcrop, hand specimen, and core. Digital field note books will have a selection of descriptors built into their software. If you use actual pencil and paper, tape your list of basic descriptions on the inside cover of the notebook.
Outcrop descriptions:
Here are a few links to annotated images of outcrops.
This page has links to sedimentary lithofacies descriptions. Additions to the lithofacies list is a continuing project.
Getting started
If possible, decide beforehand where the section traverse should go to take advantage of the best, most continuous exposure, noting areas that may be difficult or even dangerous to work. Aerial imagery is a good place to start this decision-making process.
Locate the section (top and bottom) on a topography map (grid references), aerial photo or image. There’s no point measuring the section if you cannot later locate it geographically. Add the date and other relevant information.
Before launching at the outcrop, it is a good idea to stand back for a more expansive view of your intended traverse. Things to look for include potential hazards, ease of access, changes in the quality of exposure, and any large-scale stratigraphic or structural features that can be checked when you are face to face with the rocks. When you have finished measuring the section it pays to look back again, from a distance, checking for a stratigraphic trend or structure you didn’t observe the first time.
Briefly describe the condition of the exposure – steep slope or shallow; rubbly; are there vegetation or soil covered areas? Note the weather conditions.
At the outcrop determine stratigraphic way-up. We usually measure a section from oldest to youngest (borehole stratigraphy is measured the other way).
Decide how you will measure and record the section. Are you interested in detail and hence measure bed by bed, or do you have one day only to record a two kilometre-thick section, in which case you will probably measure packages of strata? The choice is a bit arbitrary and depends on the nature of the project and its desired outcome.
Decide how you will record your observations: notes, sketches, stratigraphic columns, photos, samples. My own preference is to draw a stick-like stratigraphic column as I work through the section, adding side notes and symbols for sedimentary structures, fossils, samples etc. I like this method because I can begin to visualize any stratigraphic variations such as coarsening or fining upward trends. The scale for this column will depend on the level of detail you require. There are Apps and programs that will automate this process, if you’re using digital devices. BUT… keep in mind that you are not just recording the stratigraphic section – you are trying to see through it. Automated field tasks are fine for speeding up the recording process, but nothing can replace manual, pencil sketching to help you understand the problem in front of you. Don’t use the excuse “but I can’t draw”. Field sketches are not meant to be works of art. They are supposed to be quick renderings of the outcrop, hillside or whatever, capturing the ingredients that are essential to geology and landscapes. You do not need to reproduce the landscape with Andrew Wyeth precision. Annotated field sketches also add meaning to photographic images; if light conditions are poor they may be the only record you have.
Chose a convenient scale for the stick column – one that allows plenty of notes. I find it necessary to vary the scale from time to time, if I want more or less detail in parts of the section. Any changes in scale can be accounted when redrawing the column to a common scale.
Most field geos use some form of shorthand for recording their observations, particularly when there is a lot of repetition. This comment also applies to use of symbols, for example different kinds of crossbed, trace fossil, or bed contact. Some institutions will have their own set of symbols and abbreviations. What ever system you adopt, make sure it is used consistently. Keep in mind that the field notes are primarily for YOU. You can redraw stratigraphic columns and sketches to make them legible for others, or for publication.
Decide ahead of time the kinds of samples you need to collect – macro/microfossils, petrographic, radiometric dating. Will you need materials to wrap delicate fossils, or tough bags for sharp-edge rocks? Make certain that sample labels are waterproof and won’t rub off after a day of rattling around in your backpack. It is imperative that samples are keyed to the correct stratigraphic unit.
Take lots of photos. Link these images to your columns, notes and sketches. There is no such thing as ‘too many images’. Take close-up photos before you hack the outcrop, structure or fossil with your hammer. No one will be interested in a photo of a pile of rubble. Backup your images when back at camp.
It is unlikely your section will traverse a nice straight line; you may need to move laterally to find good exposure if the outcrop is covered by scree, snow etc. It is important when shifting the line of section that you work from the same stratigraphic horizon. Mark the progress of the traverse on a map or aerial image.
If the line of traverse shifts sideways a significant distance, then it should be considered a new section and located-annotated accordingly. There is no set rule for this. Whatever shifts in the line of section are deemed necessary, they can be illustrated on a cross-section that shows the relative positions of the stratigraphic columns.
At the end of the section or back at camp, take photos of your notes, columns and sketches – as backup. Then backup all your images.
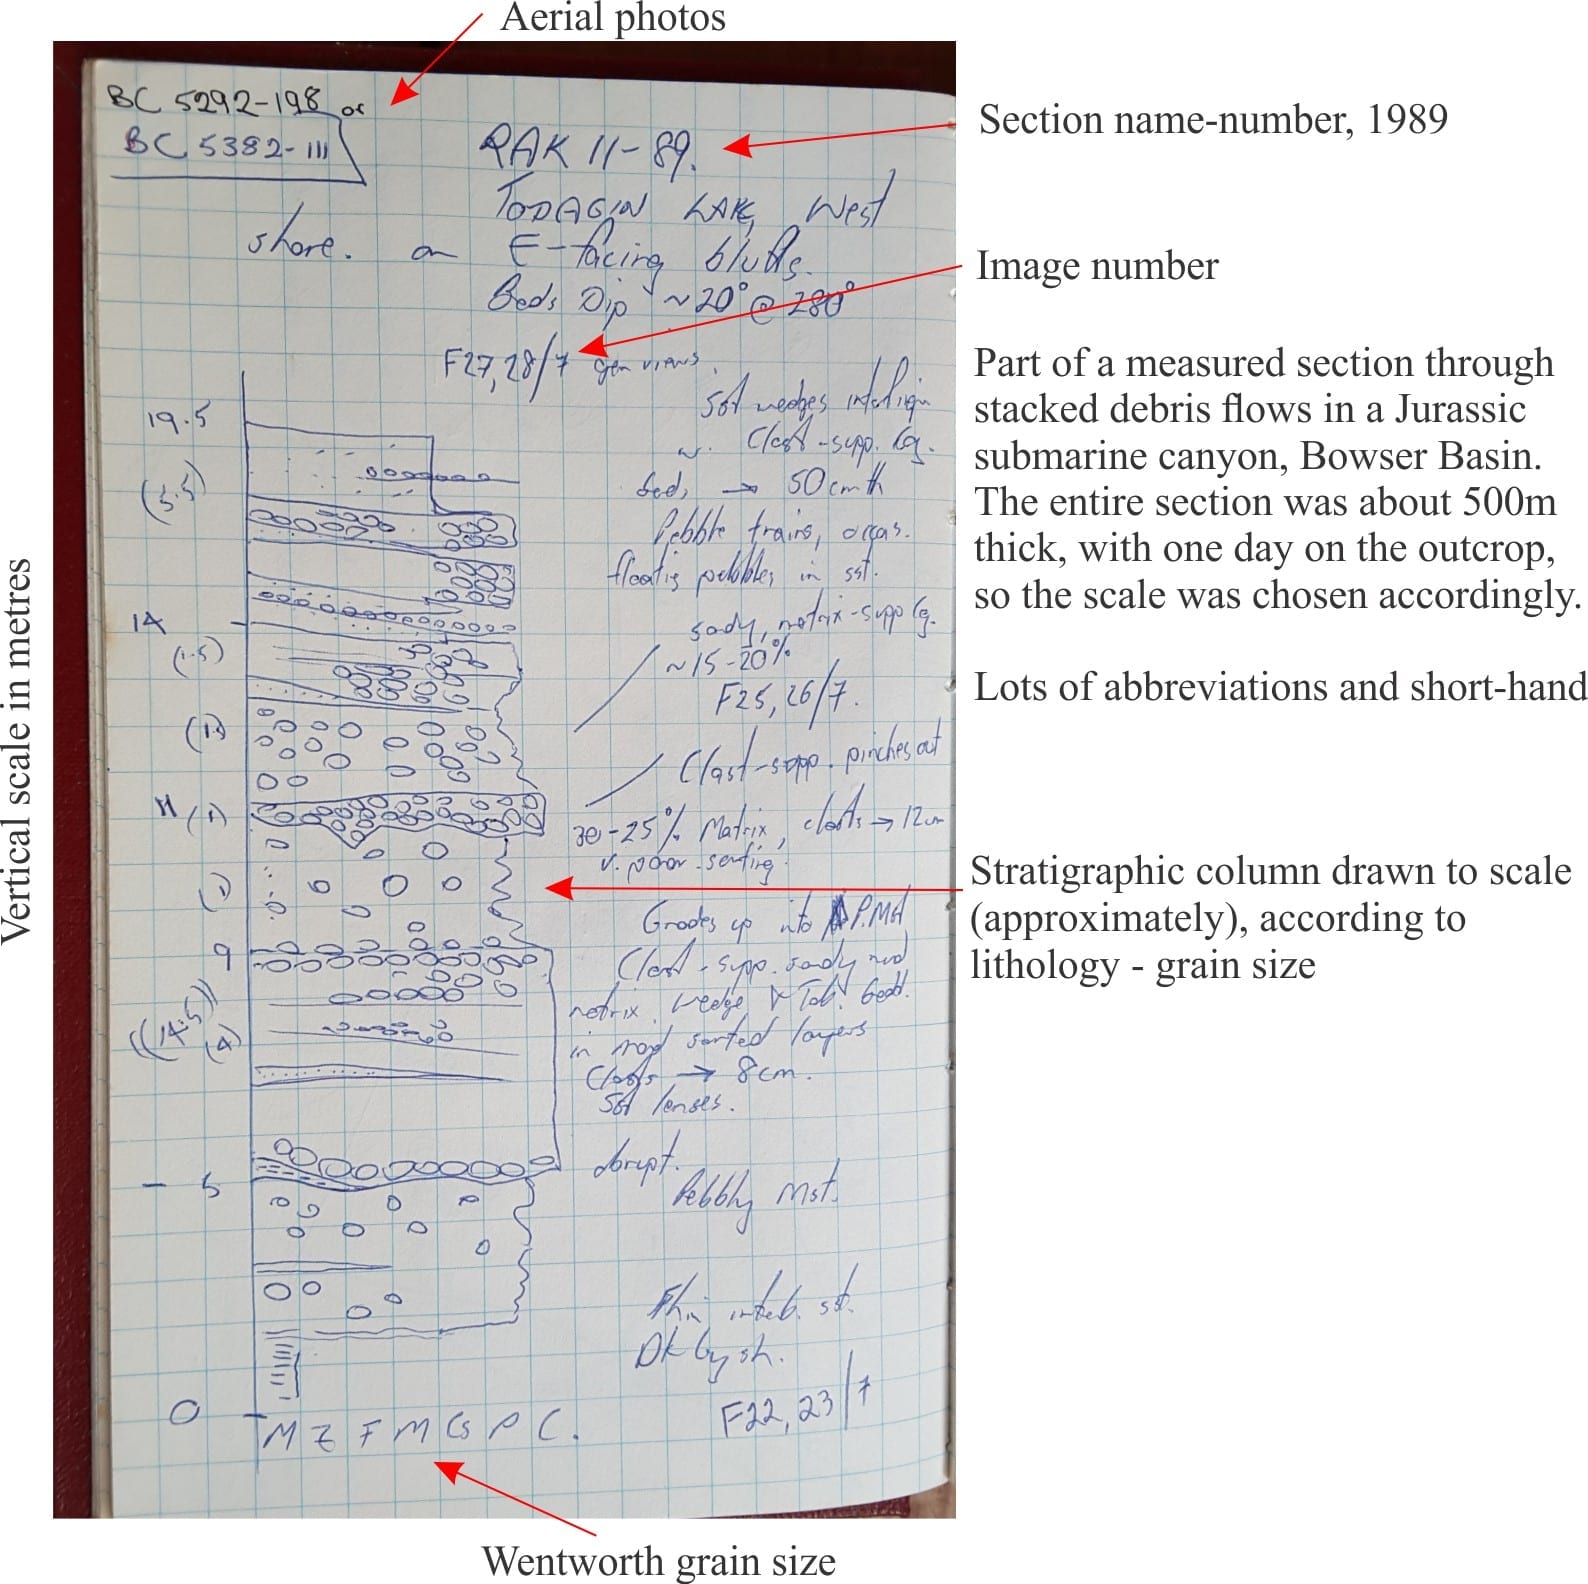
Here is a typical ‘stick’ stratigraphic column in more or less final form with a few symbols in common use (not encyclopedic)
At the end of your field day, back at camp with a cup of tea or gin-and-tonic, it is important to review your notes, images and samples. Field notes and sketches tend to be messy, crossings out, smudged with dirt and rain drops. If your field notes are immaculate then you have probably spent too much time on the outcrop or section. When back at camp, redraw the stratigraphic column, adding any additional notes or questions about some aspect of the geology that needs checking. At this stage you can spell out or explain the abbreviations and add lists of symbols. This process may seem redundant, but it is redundant only if you learn nothing from it.
Plotting the stratigraphic section and annotating it with all the observations (and questions) is very satisfying. Here you have the basis for some initial interpretation of paleoenvironments, sedimentary facies and paleocurrents. However, your interpretations will only be as good as the quality of the data collected. You can never collect too much data!
With a bit of luck, the adjacent section you measure the following day will make the interpretations more complicated (and therefore more interesting).
Sedimentary strata are commonly deformed. If we assume that the original depositional dip was close to horizontal (this is a reasonable assumption, although there are exceptions) then we need to account for structural dip. This is important if our sedimentary analysis includes measurement of paleocurrents, depositional dip and strike (e.g. ancient shorelines, rivers), or any paleogeographic determination.
Two methods are outlined here: the standard stereographic projection method that is usually done back in the lab unless you are lucky enough to have access to the internet in the field; and a quick field method using a field note book, pencil and compass; this method can only be used in strata folded by a single phase of deformation.
Stereographic method
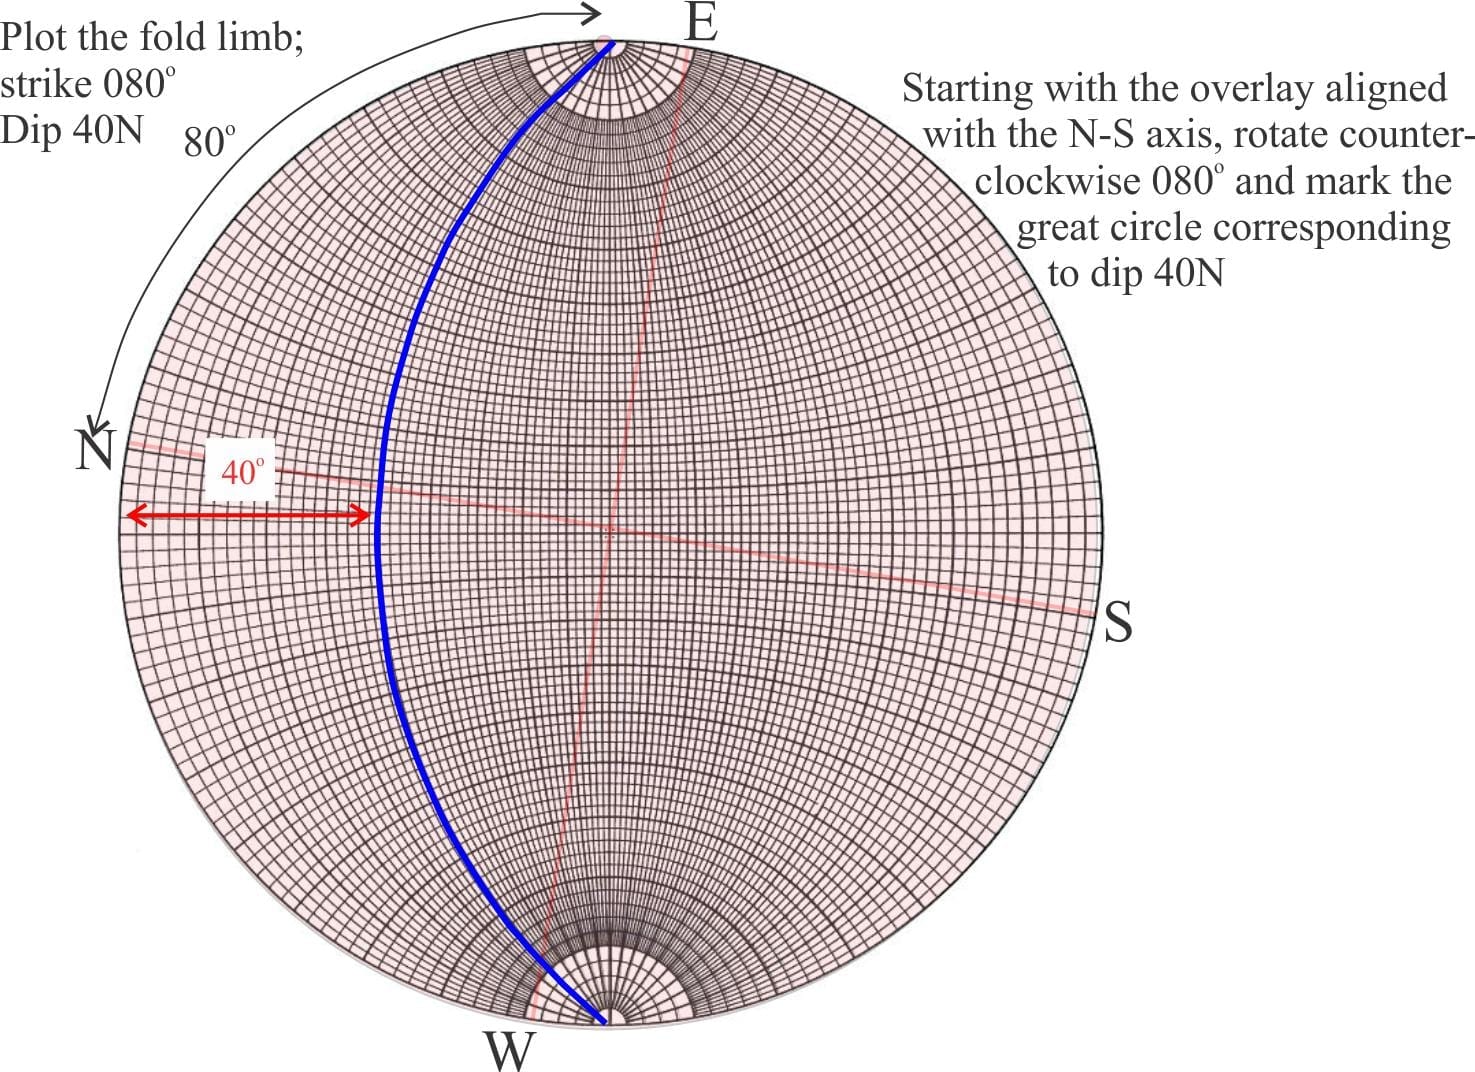
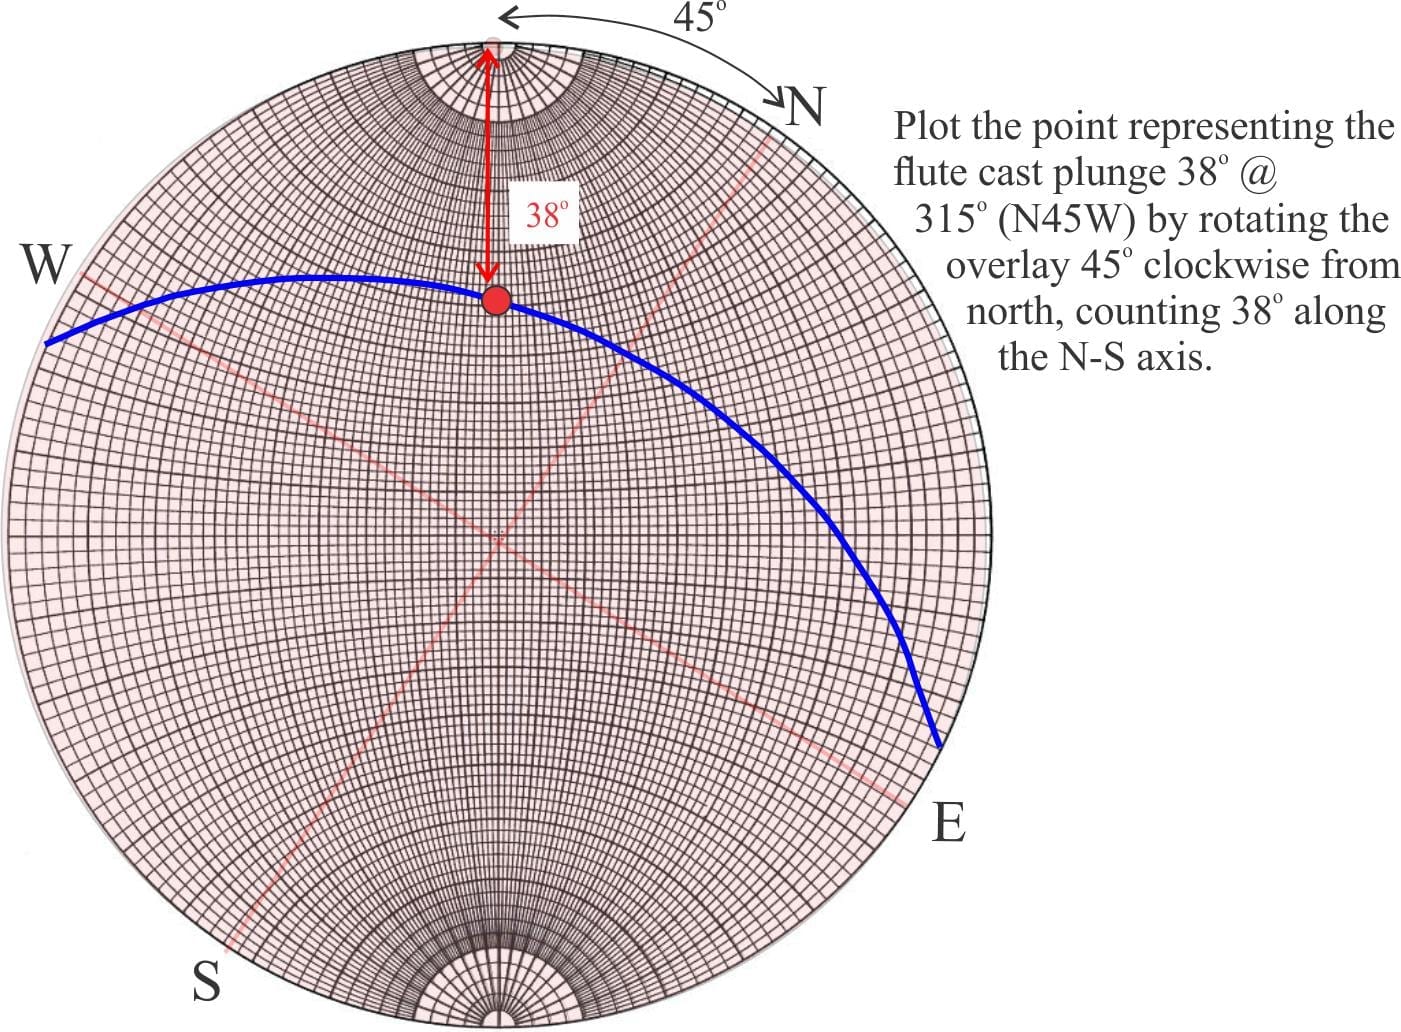
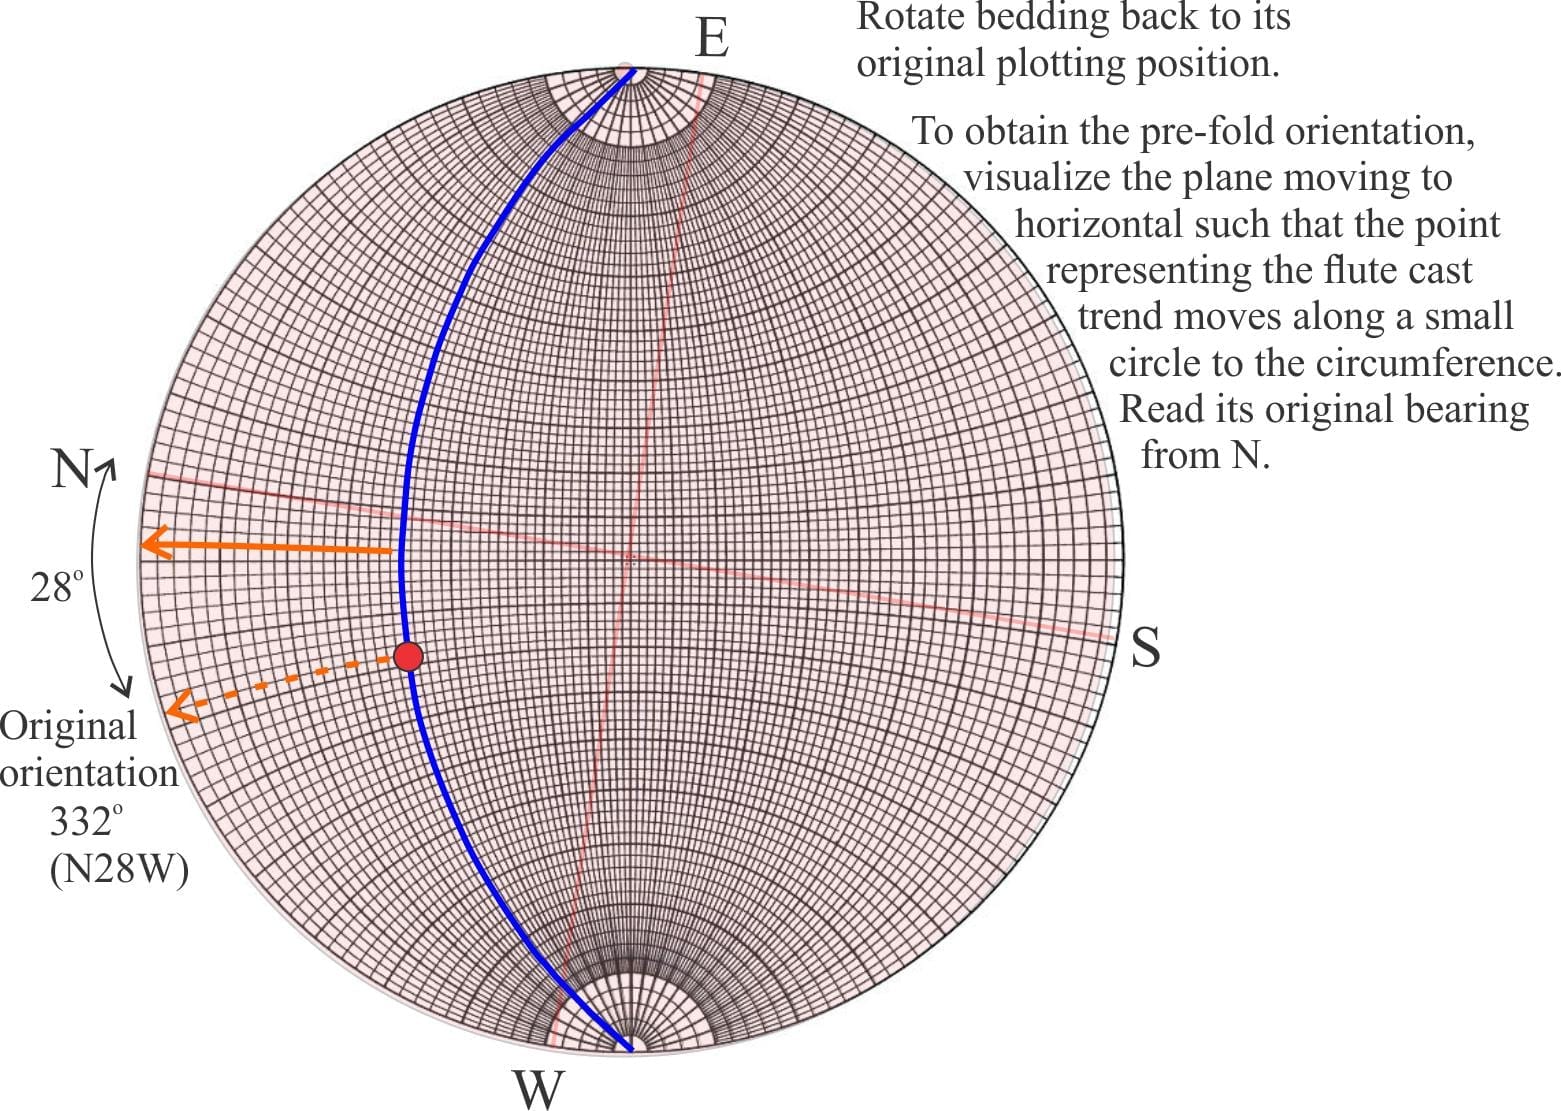
In the simplest case (diagrams below), strata containing flute casts have been folded into a syncline with a horizontal fold axis; we need to correct the for dip in the fold limb to find the original orientation of the flute cast. Bedding strikes 080o (N80E), dip 40oN; the flute cast plunges 38o at 315o (N45W).
On a transparent overlay, plot the plane (strike and dip) and the line (orientation and plunge) representing the flute cast (it will be a point on the great circle) on the stereonet. To return the plane to its original pre-fold orientation, it must be rotated about its strike; the next step is to move the great circle back to its original plotting position. When the plane is rotated to horizontal all points on the great circle will move along small circles to the stereonet perimeter. The point representing the flute cast is now in its original orientation – here 332o, or N28W. The difference between the uncorrected and corrected bearing is 14o.
Direct field method
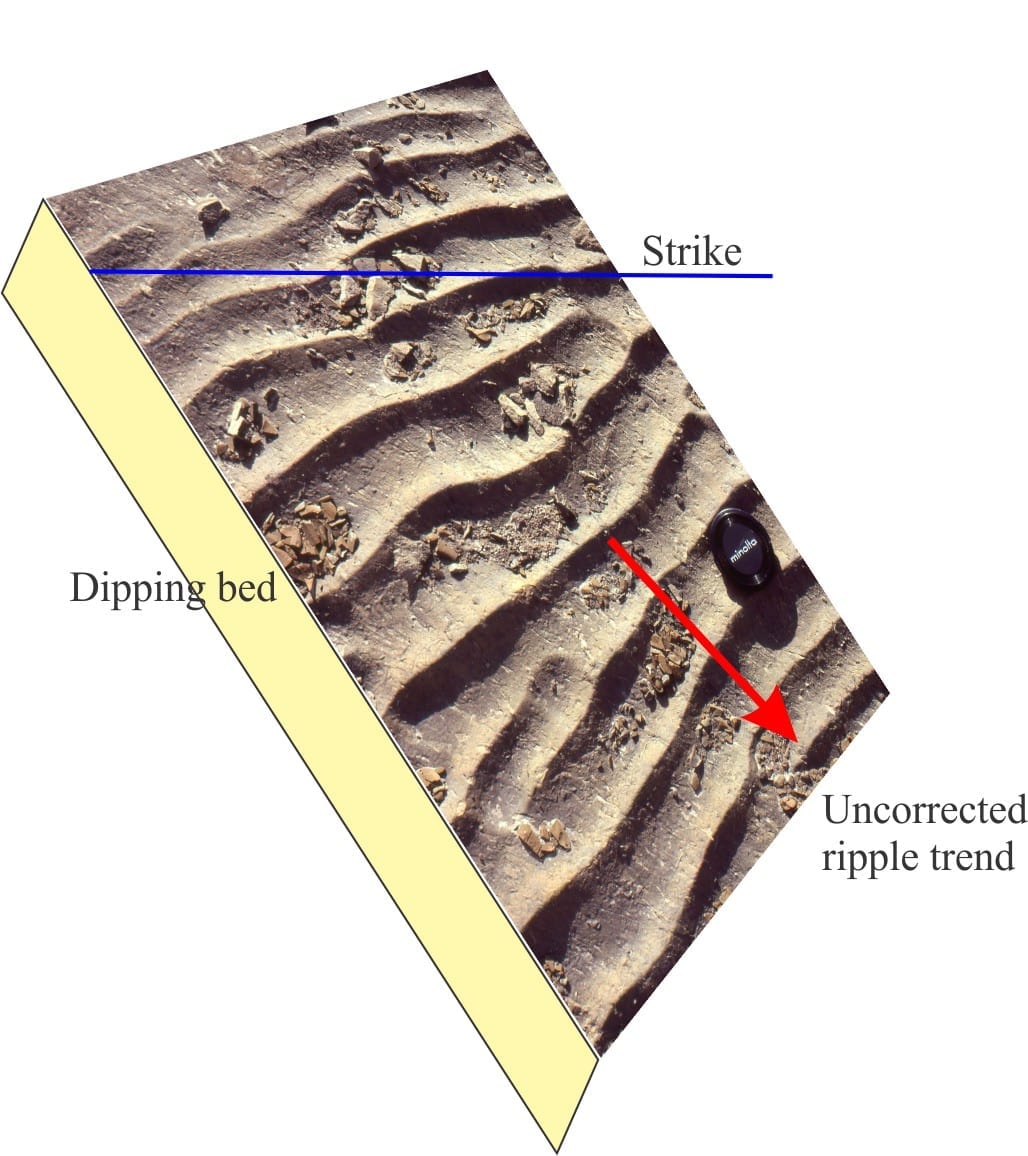
You can use this method when sedimentary structures (or any linear trend) are exposed on bedding planes. It basically performs the same task as a stereonet correction.
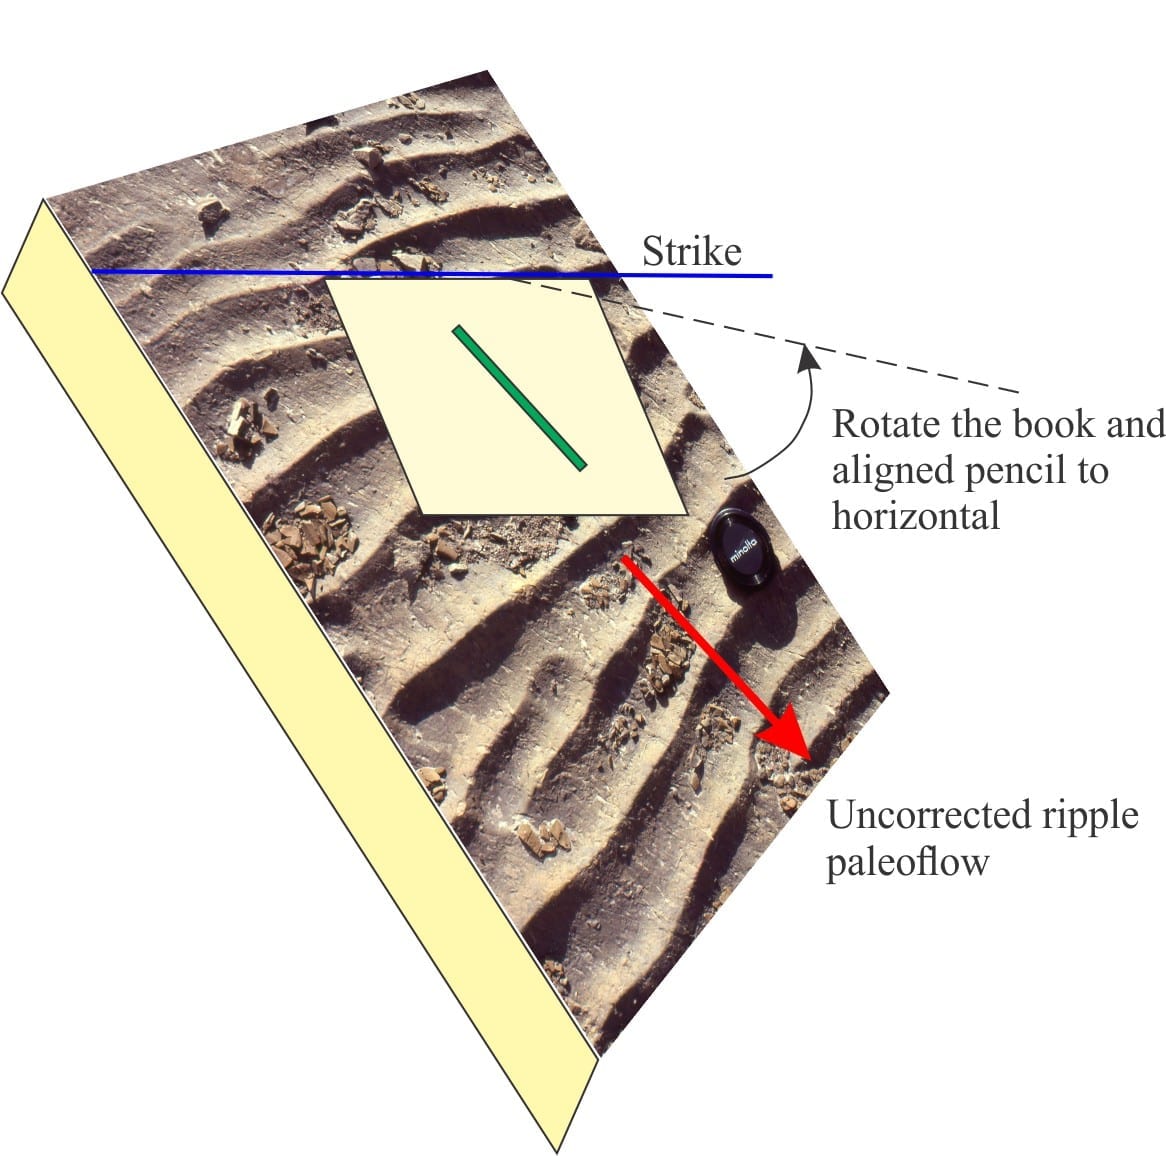
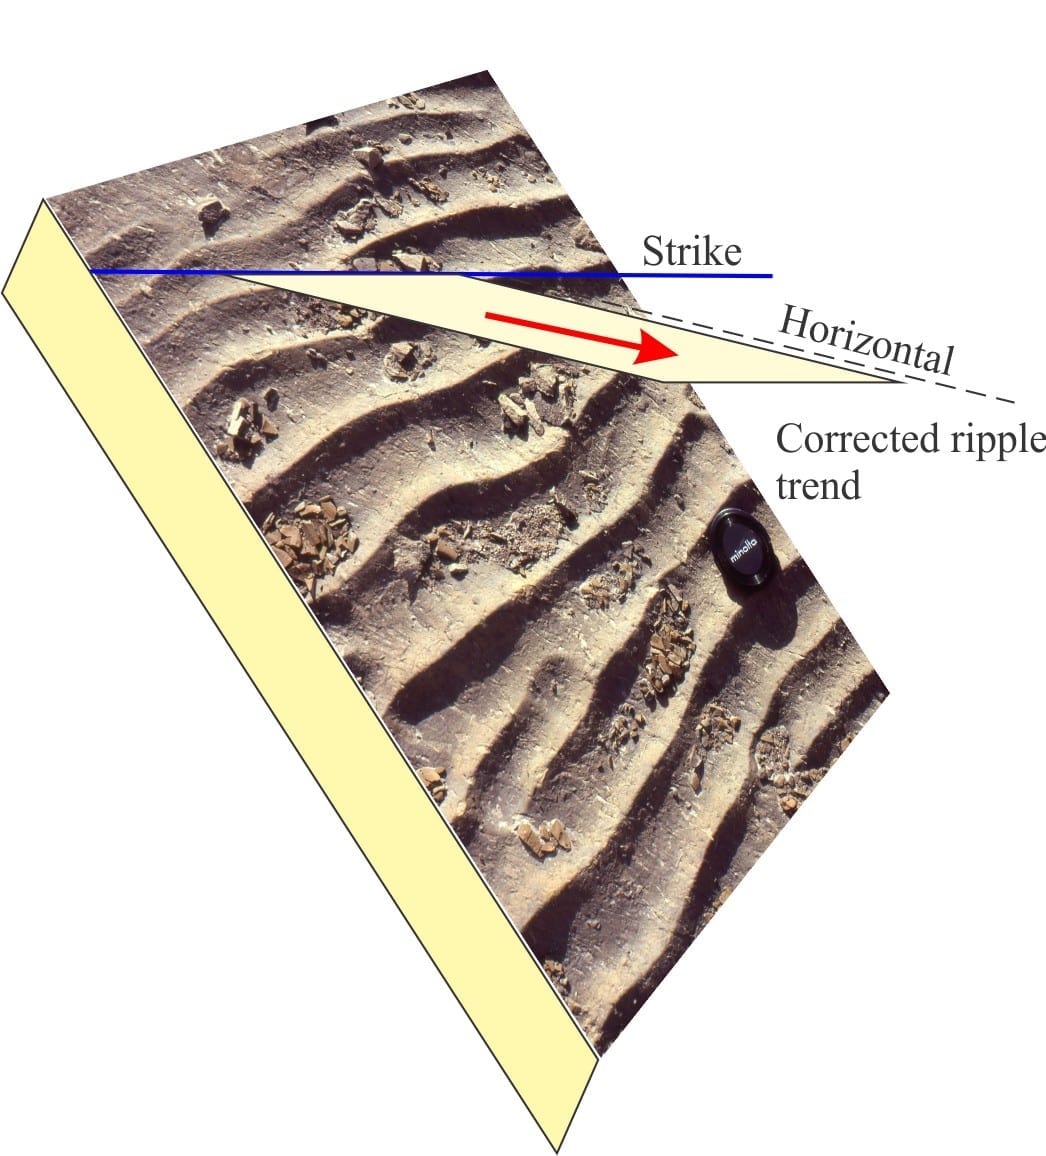
Place a hard, flat surface on bedding – hard-cover note book or board are good – with the long edge oriented along strike. Place a pencil or similar straight-edge on the surface such that it is aligned with the structure of interest (flute long axis, ripple trend etc). Rotate the book about its long edge (i.e. about the strike) until it is horizontal – make sure the straight-edge doesn’t move. Holding the book and straight-edge in place, measure the bearing.
If you are not convinced about the accuracy of the field method, check it against the stereonet correction. You will find with practice, and not a little care, that direct field measurement provides excellent results.
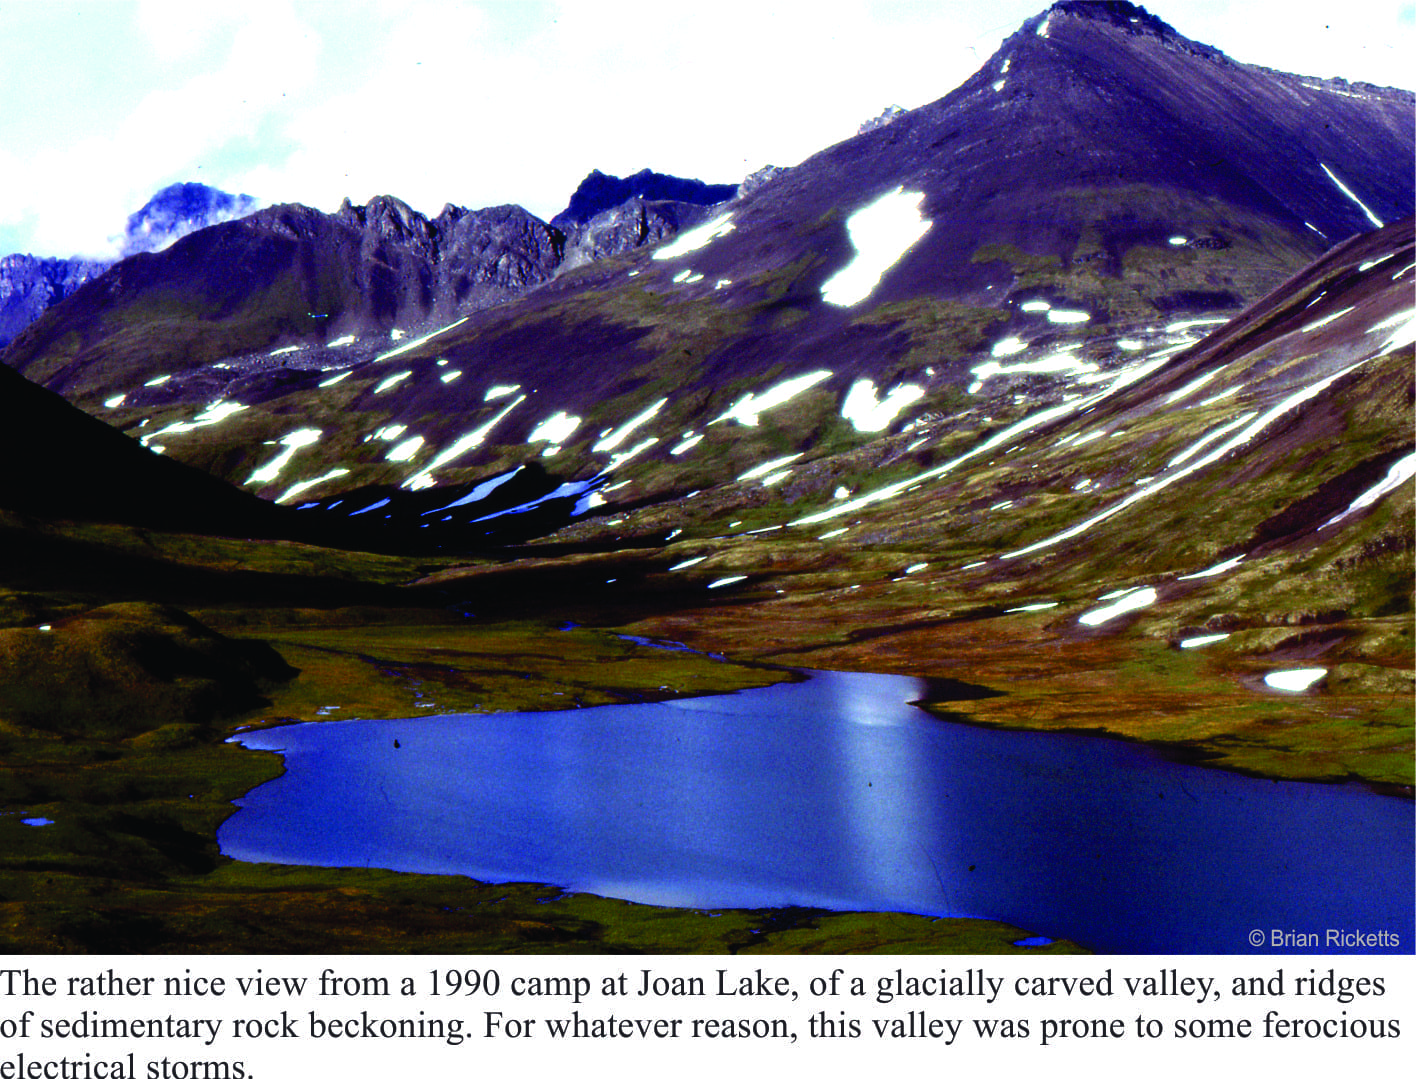
The interior of northern British Columbia is rugged, mountainous country. Roads, that tend to be quite rough were frequently opened to provide access to mines and small settlements. It is an isolated part of the world, beautiful, even majestic, but also unforgiving. East of the Coast Mountains and about 200km south of Yukon, is a huge swath of sedimentary rocks, referred to collectively as Bowser Basin. The rocks are Jurassic to Cretaceous, recording a history of about 70 million years duration. Humungous volumes of sediment were eroded from older rocks to the north, that were uplifted and deformed as tectonic plates, or terranes, collided with the ancient margin of North America. Gravel, sand and mud were carried by braided rivers, supplying coarse sand and gravel to the coast and beyond, and to large deltas that supported lush forests (later converted to coal). Continue reading →
The best field projects are those that last several seasons; the ones you kind of own or share with any number of co-conspirators. These are the projects for which there can be scientifically productive tangents, and where there is usually regional or universal context. Then there are those odd, short-term projects that, at the time, seem a bit ad hoc but still present the opportunity for good science, and new adventures; 1982 was such a season. I was tasked with sorting out a group of sedimentary rocks in west Yukon, a hop, skip and a jump from the Alaskan border. This was the first and last time I worked in an area with substantial bush cover. The best exposure was on ridges above the tree-line, but to get from one ridge to another required crashing through northern boreal forest and the odd, insect-infested swamp. The black flies, deer flies, mosquitos and no-see-ums were something else. Continue reading →
My early geological education was very much New Zealand centered; the gamut of sedimentary, igneous and metamorphic rocks (there are no Precambrian rocks in New Zealand), in the context of a landmass (and attached submerged bits) still rent by active faults and erupting volcanoes. The timing was fortuitous. We were taught at the cusp of the ‘new tectonics’, sea-floor spreading, and the morphing of continental drift into plate tectonics. The fixists were a disappearing breed; now everything was on the move, attached in some way to one tectonic plate or another, rifted, drifted, and eventually subducted. Now, the rock formations, faults (particularly the Alpine Fault), and the volcanoes, were all connected in one, all-encompassing global, plate tectonic system. Geologically active New Zealand had a place in this grand scheme.
Admittedly, not all our professors found it easy to teach these revolutionary ideas. We would be exhorted to go and read the latest journal papers, and come back with questions – I guess this gave the teachers time to read the articles themselves. But it was an exciting time, reading the claims and counterclaims. It really was a (Thomas Kuhn) paradigm shift.
Landing on the shores of Belcher Islands (Hudson Bay) was also something of a mind warp; from a country that straddles a plate boundary, has a volcanic rift zone in central North Island, and faces a subduction zone within a stone’s throw of the east coast, to a part of the Canadian Shield where not much has happened over the last two billion years. Perhaps that’s a bit of an exaggeration, but this prolonged period of stasis had its advantages. The rocks, despite being about 2000 million years old, are loaded with beautifully preserved structures and fossils. They were not cooked by metamorphism during the time they spent being buried, nor fractured beyond recognition by tectonic forces. Basically, everything was intact. Stunning.
For someone interested in deciphering ancient sedimentary environments, being parachuted into the Belchers and being told to take the rocks apart, layer by layer, sequence by sequence, was initially a tad scary; an emotional response that quickly dissipated once the measuring, observation, and interpretations had begun. On finishing the work on one set of exposures, we couldn’t wait to get to the next, and the next.
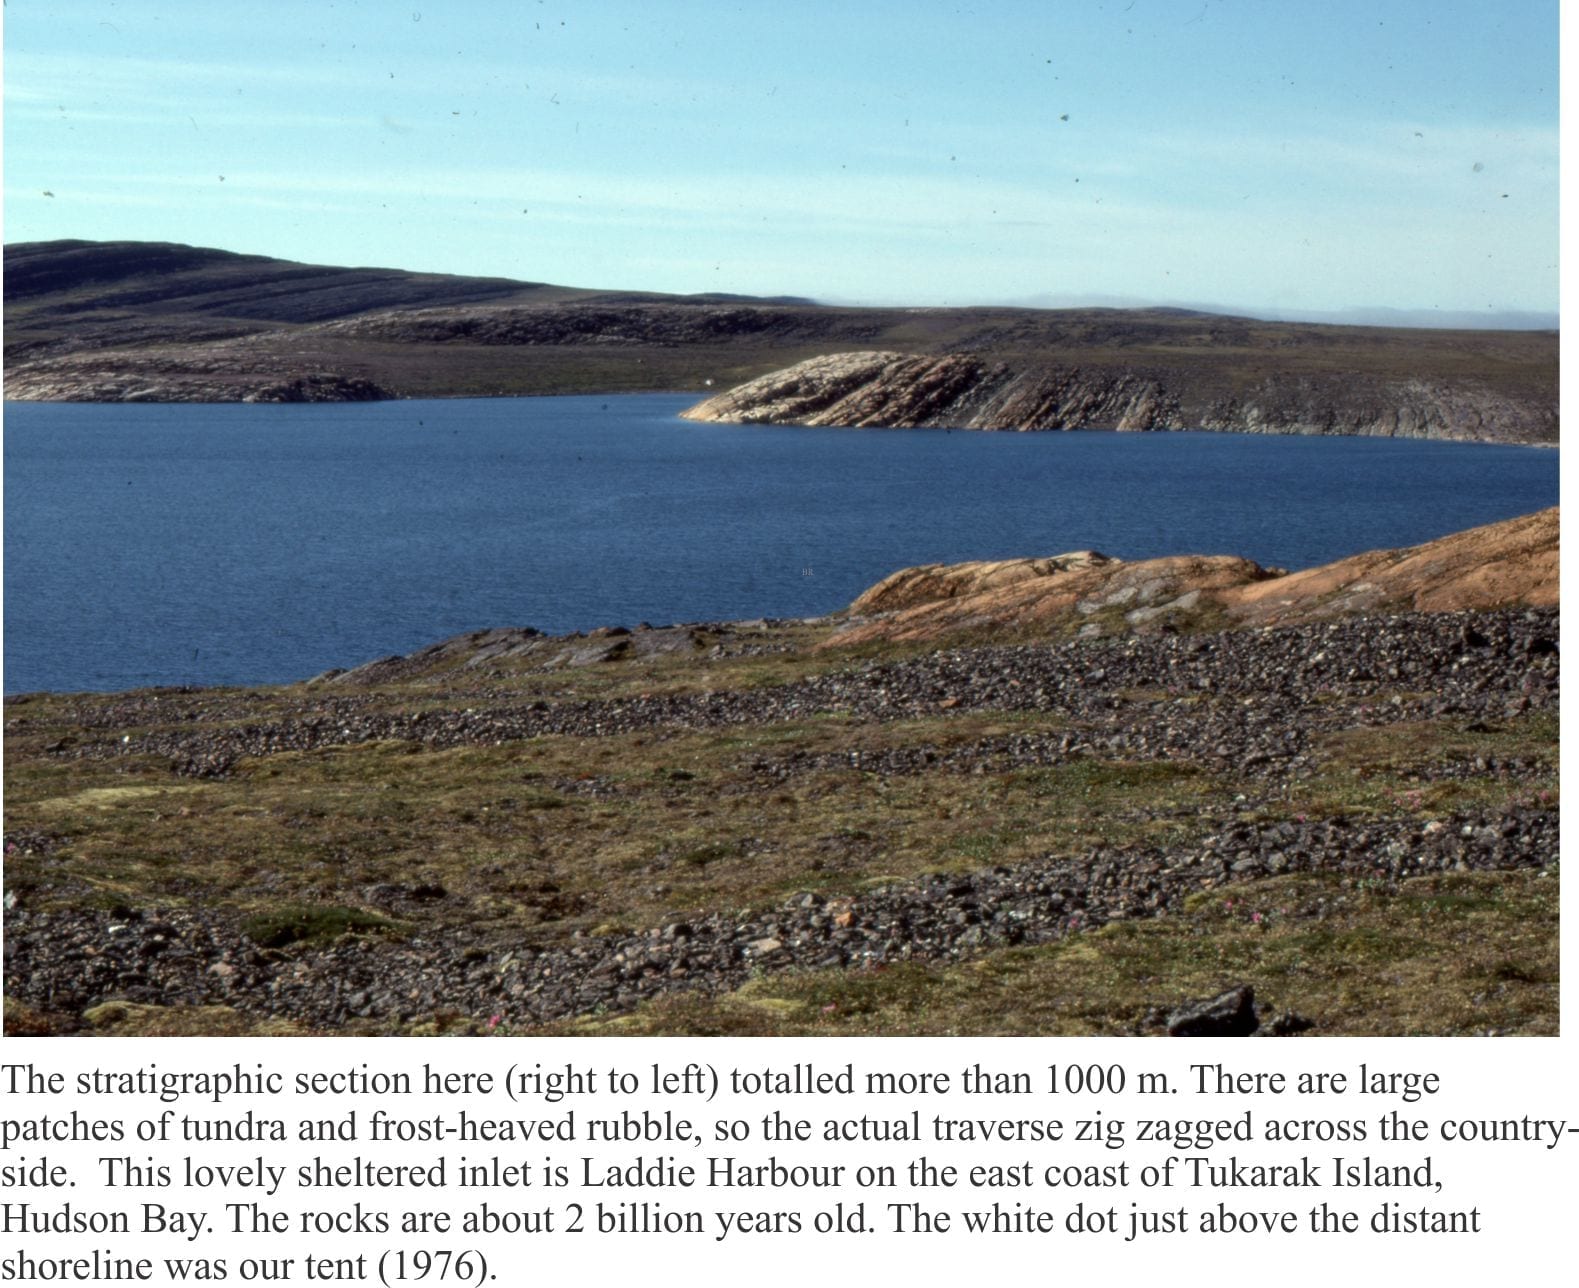
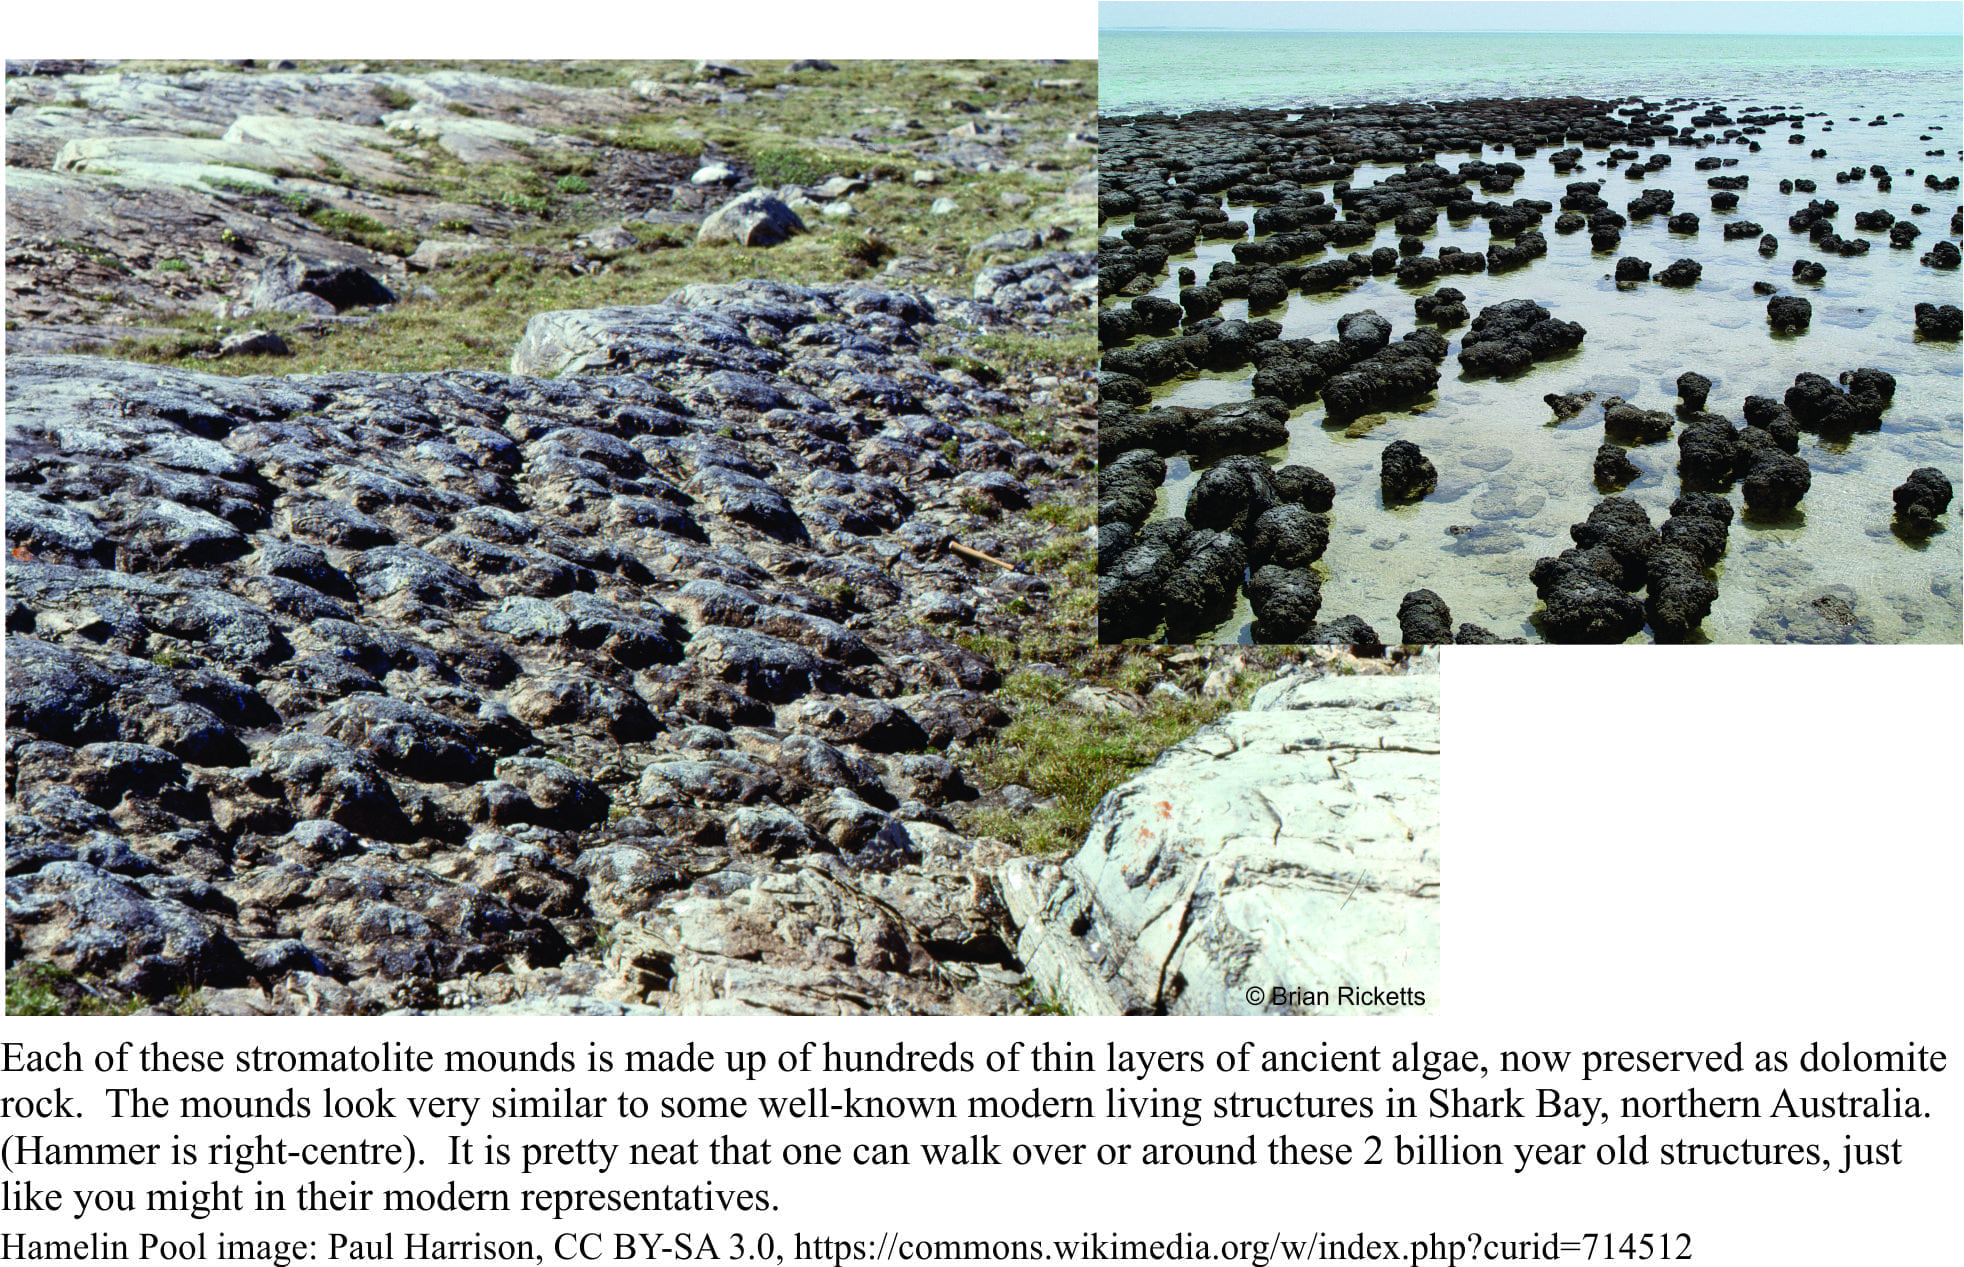
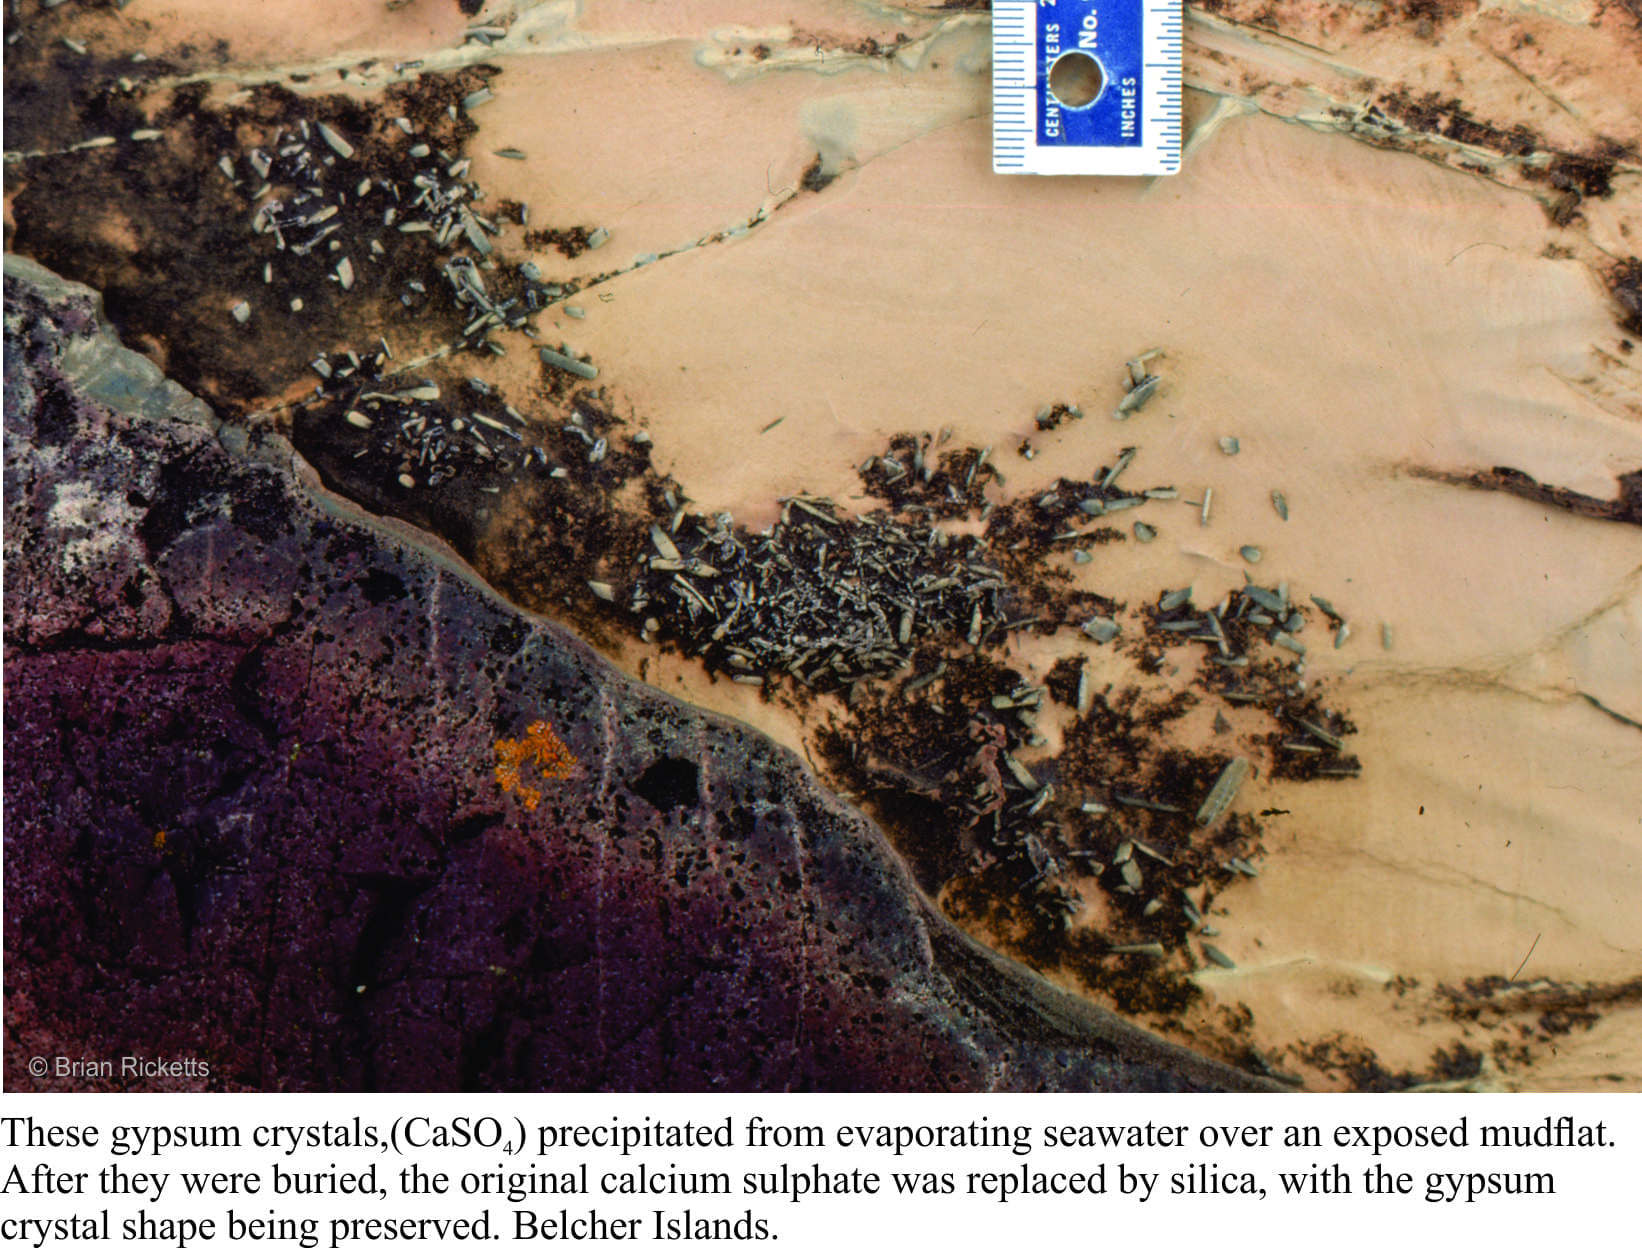
If you were to stand all the Belcher strata in a single pile, it would be almost 9 km thick. But this pile was subsequently tipped on its side. Over the eons, the rocks were eroded by rivers and scraped by ice, fortuitous levellers that provided windows into each layer. Geologists are enticed to enter these portals, at least in their mind’s eye; the rewards are huge. We can envisage times when there were broad platforms of limestone (now all converted to the mineral dolomite), that harboured a massive biomass of primitive algae, stromatolitesof all shapes and sizes; layers as thin as a fingernail, and reefs 10s of metres high. The platforms were covered by warm, seas that shoaled into tidal flats and (deserted) beaches. Some areas infrequently inundated by high tides, became desiccated; there are remnants of minerals like gypsum and halite (common salt) that attest to salty seas. Walking over rocks like these kindles the imagination; a beach stroll, waves rolling in like they have done for billions of years, or parched landscapes exposed to the full effects of sunlight uninhibited by oxygen and the UV dampening effects of ozone (the incidence of UV light must have been intense). The experience is humbling.
However, idylls have a tendency to dissipate in the fog of time or, as was the case here, a smothering by erupting ash columns and lava flows. Now we get to walk across the tops of really ancient lava flows, around piles of pillow lavas, or along catastrophic pyroclastic flows of ash and pumice. The earlier tropical paradise had been obliterated, but even in this volcanic brutality there is wonder.
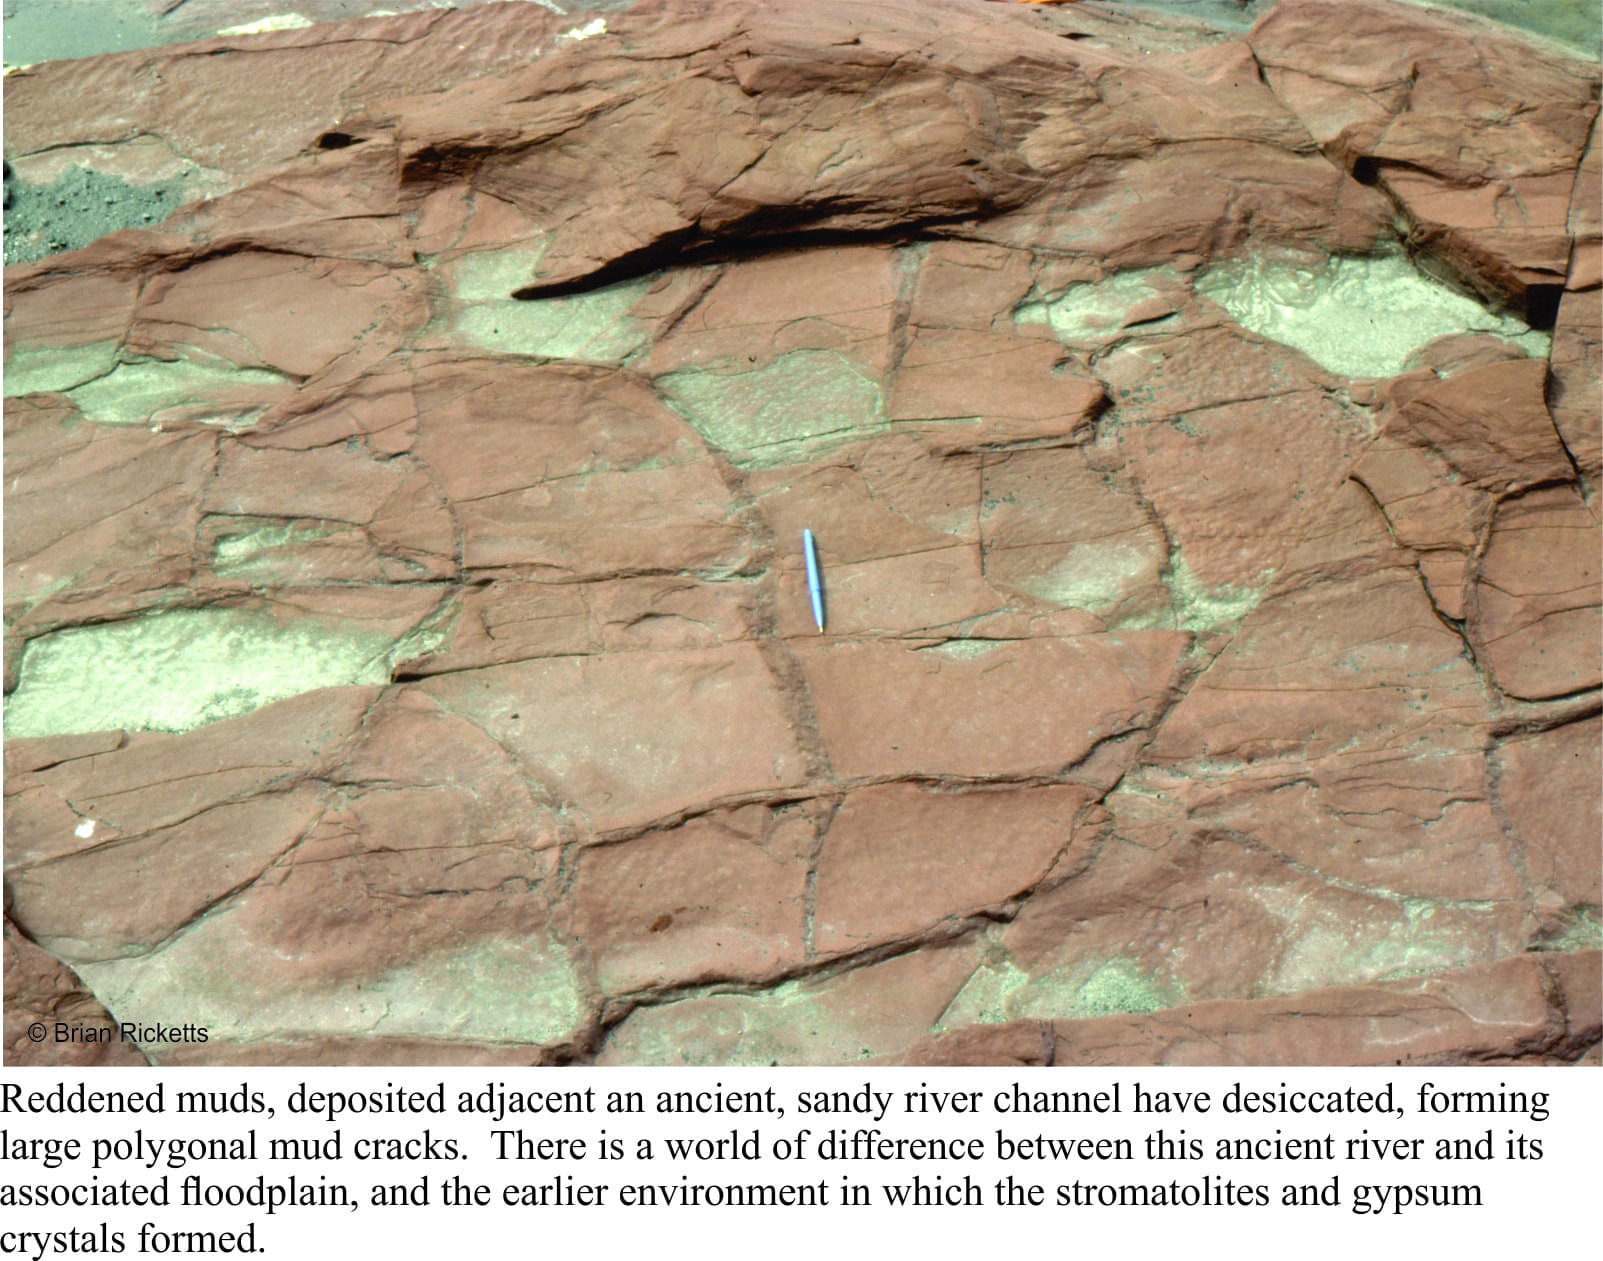
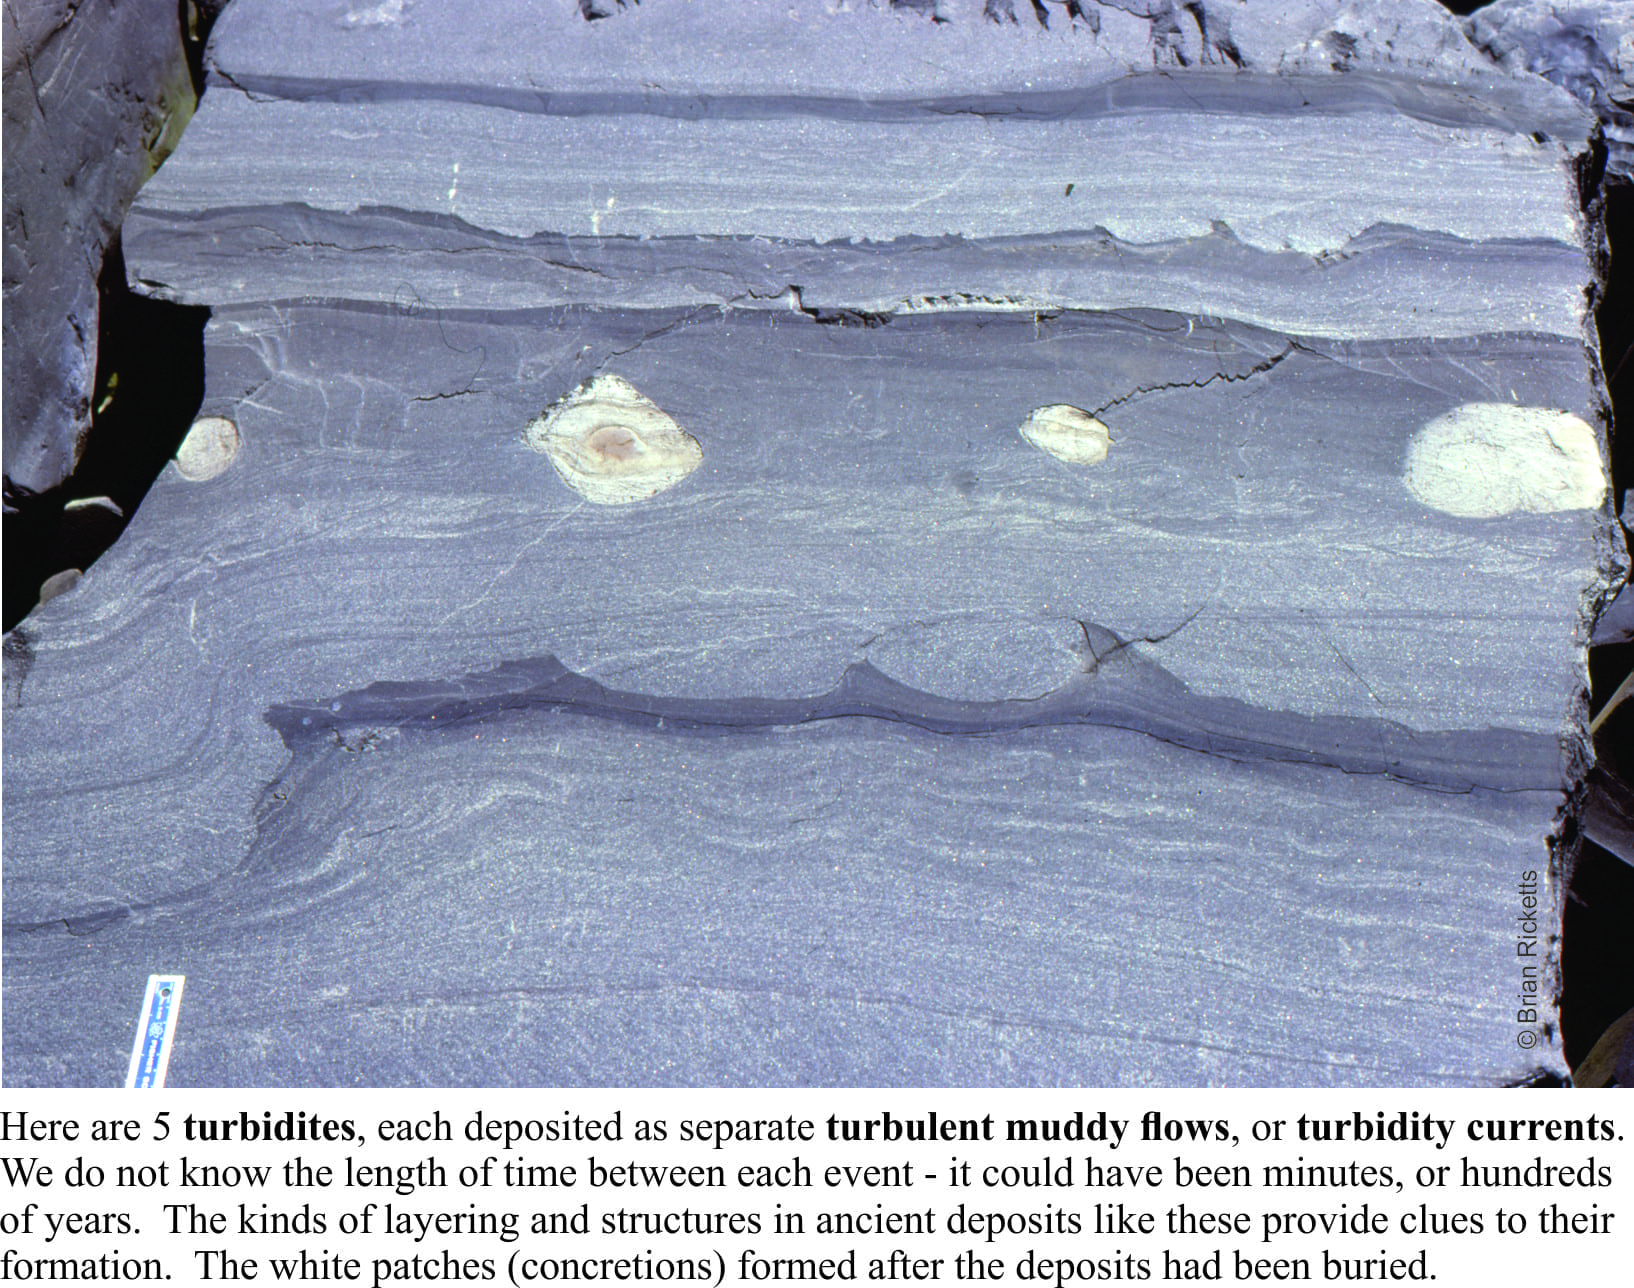
Other strata tell of deep seas fed by turbulent mud flows cascading down an ancient submarine slope, and of sandy rivers turned red by iron oxidized by the gradually increasing levels of oxygen in the ancient atmosphere (deposits like this are commonly referred to as red beds). In every layer, every rock we looked at, there were mysteries waiting to be unravelled. A geologist cannot hope to solve all such questions, but finding a solution to even one of them is incredibly satisfying.
I spent a total of 5 months in the field during the 1976-77 summers. This was not the kind of location where, if I’d forgotten to do something, I could whip back for a couple of days to sort things out. Several of my student colleagues were doing similar kinds of research in remote parts of the country – field seasons were long. Once you had arrived, you were there for the duration. And despite the sense of excitement and discovery, it was always good to get back home.
Have you ever looked at some locale on a map or photograph and thought “that looks like an intriguing place to work”, only to find, sometime later that you are smack in the middle of that same spot? Time-warp? Some god’s lap?
I was preparing to travel to Canada. The plan was to do a PhD, and because I had not long completed a Masters thesis on geologically very young sedimentary deposits, had entertained the idea that research on very old rocks would add a kind of symmetry to my geological outlook – from one end of the geological time-scale to the other. In preparation, I borrowed The Geology of Canada, a weighty tome, and homed in on the Precambrian system (basically everything older than 540 million years). What caught my attention were some squiggly-shaped islands about 150km off the southeast coast of Hudson Bay; the Belcher Islands. Their shape belied some interesting geological structures, and the strata a mix of sedimentary and volcanic rocks about 2 billion years old. What a neat place to work, although I envisioned the islands to be treed.
I arrived in Ottawa (early January, 1976) to minus 25oC and snow; I had never seen so much snow. I thought it quite beautiful, which elicited wry comments from the Ottawans I was meeting who were sick of shovelling driveways and digging vehicles out of snow drifts. Destination – Carleton University. My supervisor was to be Alan Donaldson, well-known in Precambrian geology circles. Following the introductions, he announced that my project, unless I had some objection, was to focus on the Belcher Islands. LOL. I was to spend 5 months there in total over the summers of 1976-77. The social environment, the weather, and the geology were remarkable.
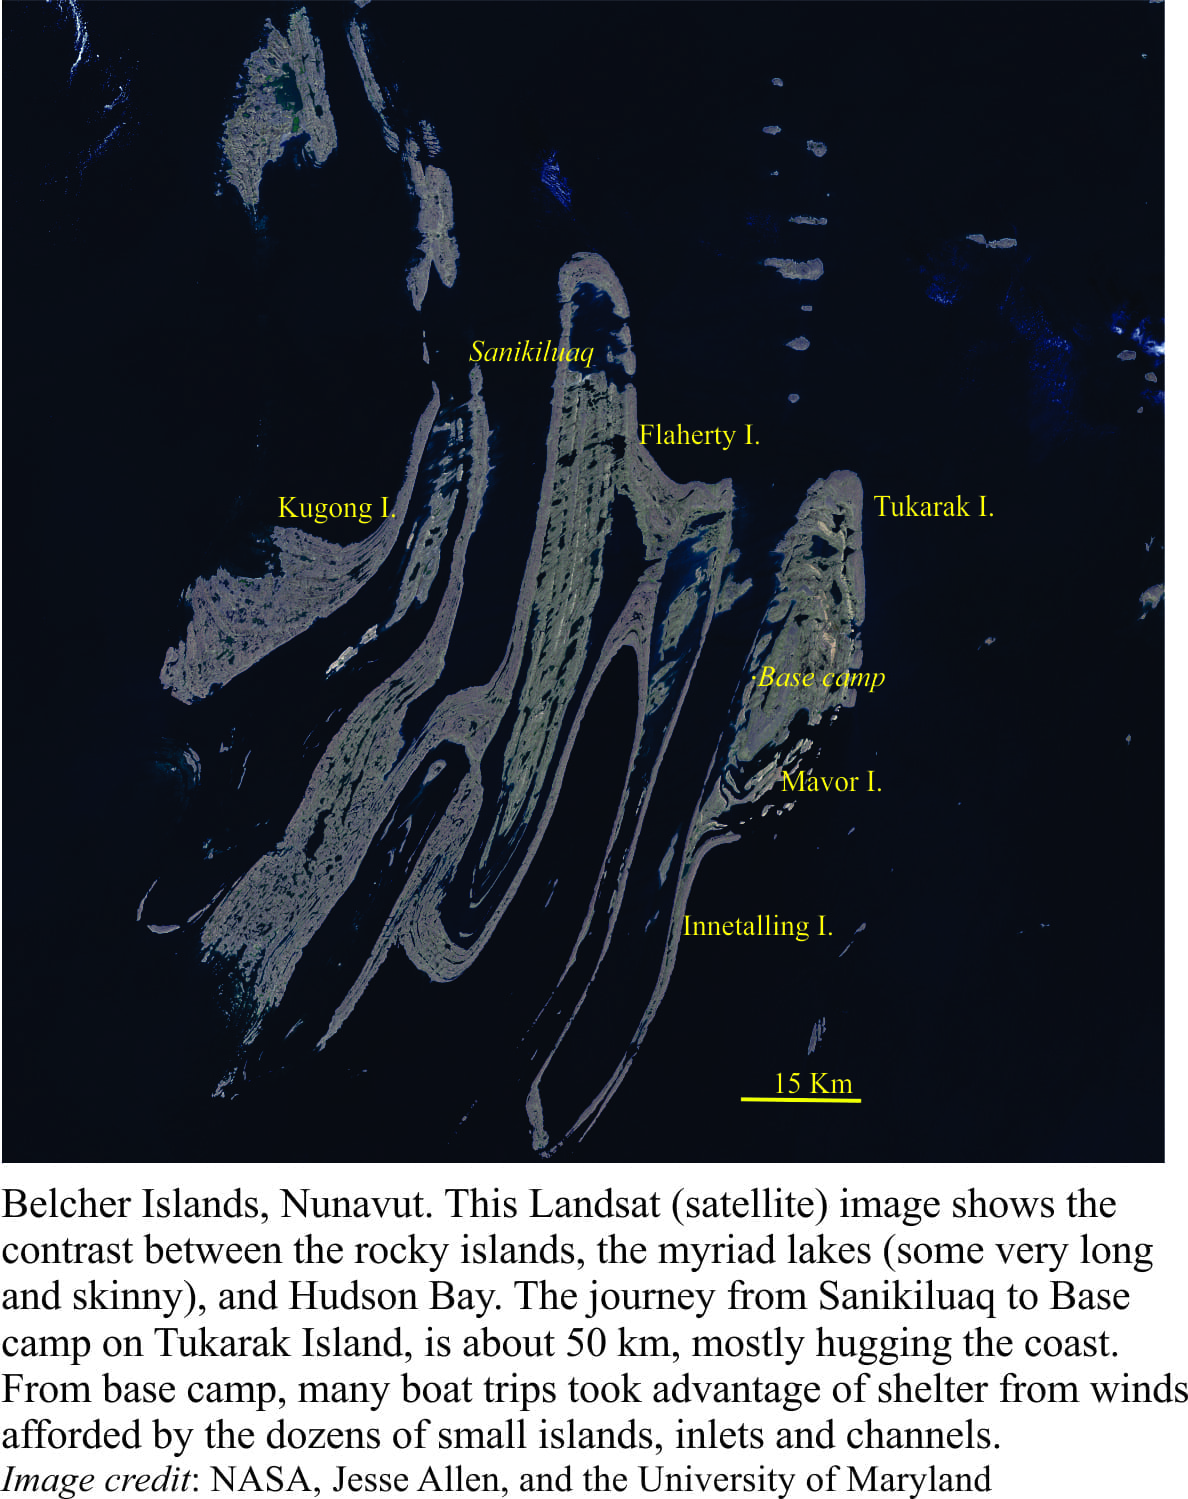
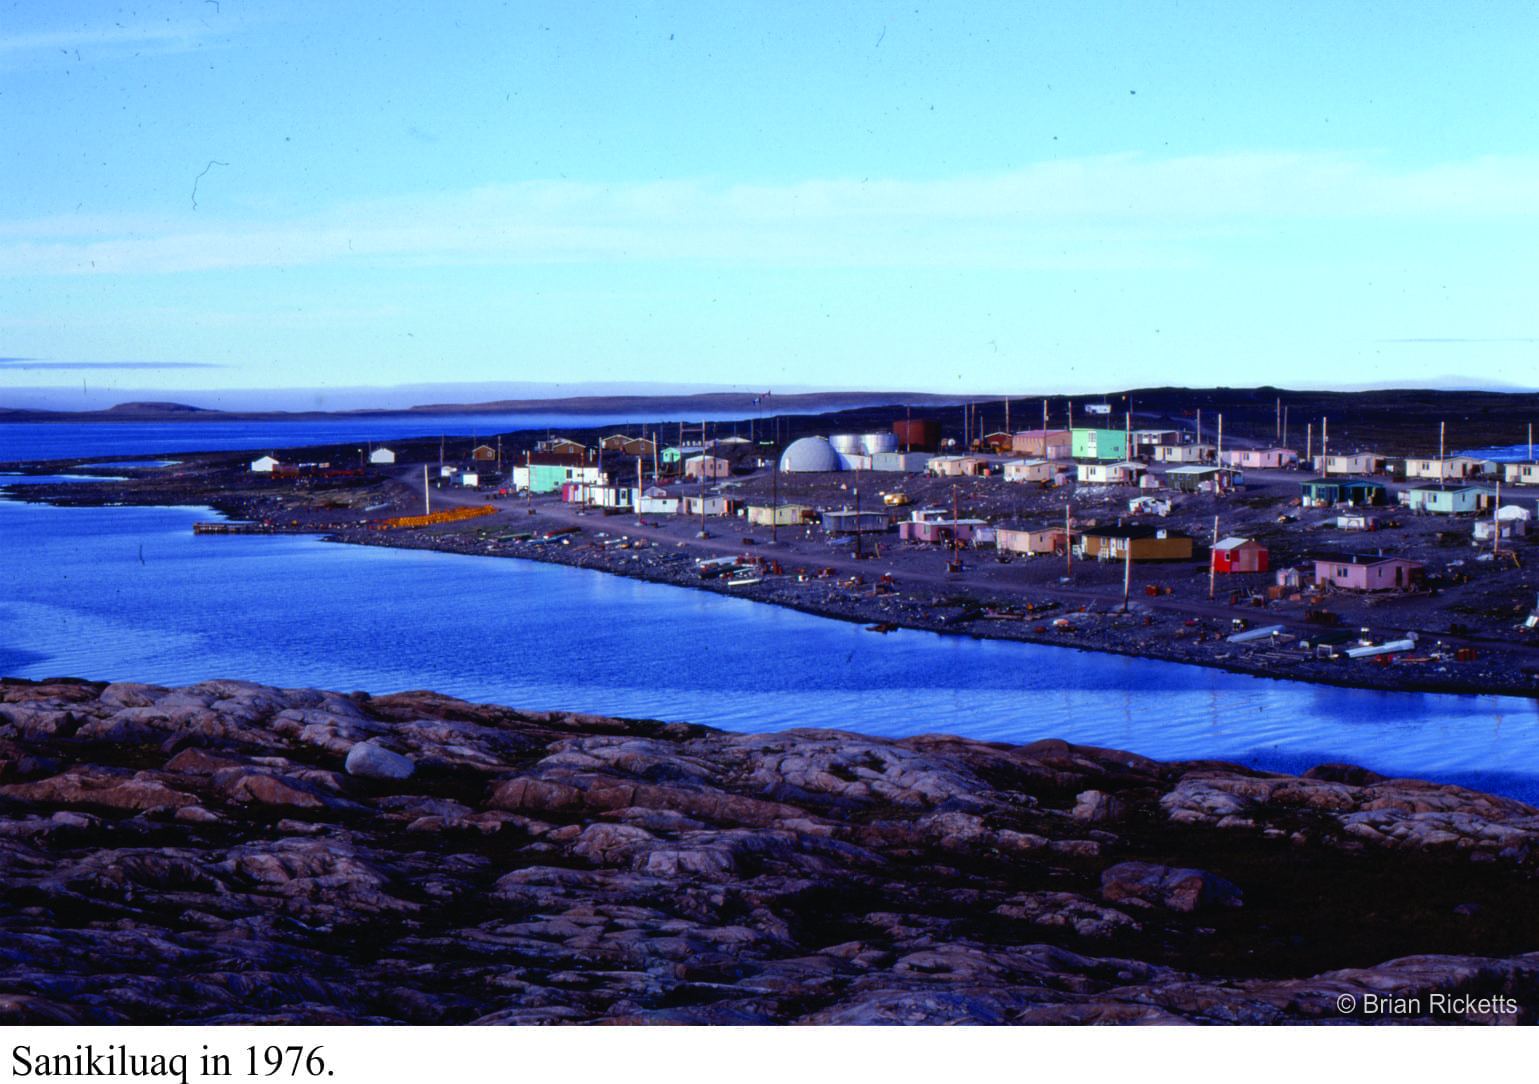
Getting to the islands was a milk run: a drive to Montreal airport, a flight to Moosonee near the southern shores of James Bay (northern Ontario), a very noisy DC3 leg to Umiujaq (Quebec) where we picked up field equipment (kindly loaned to us by the Geological Survey of Canada), then Twin Otter across the 150 km to Sanikiluaq, the sole village on Belcher Islands. We were able to stay in a small house owned by the Hudson’s Bay Company for the two days needed to sort gear, buy food, and make sure the two inflatable Zodiacs and outboards worked. My assistants (John McEwan in 1976, Mike Ware in 1877) and I always used two boats as a safety measure (and for visitors).
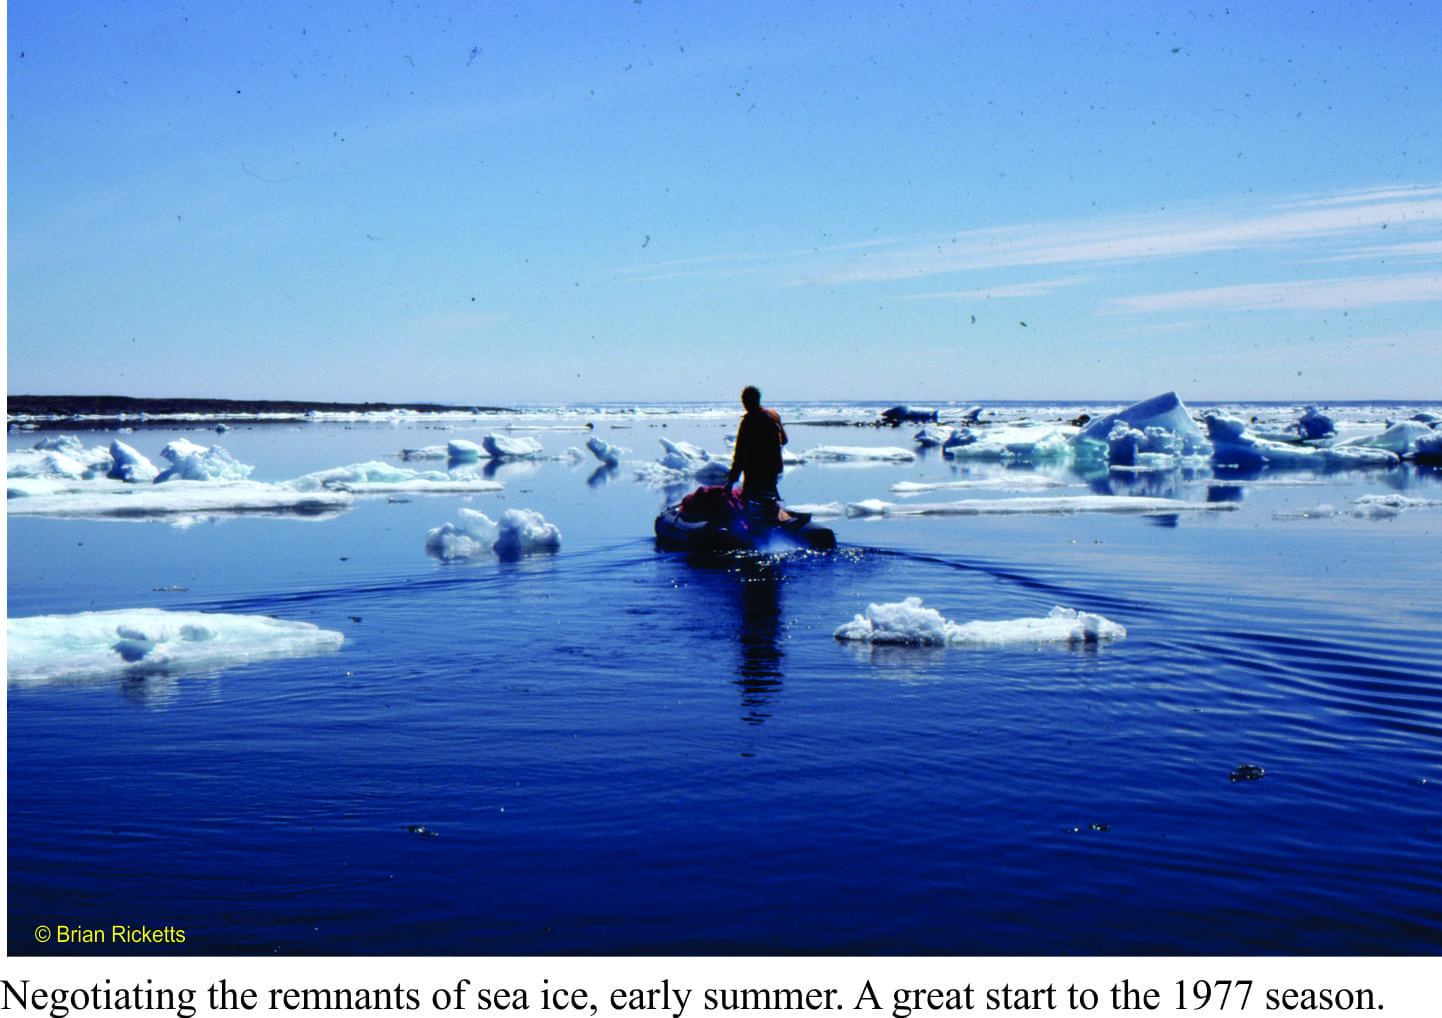
The seas around the islands are mostly ice-free during the summer months, but the water is still only a few degrees above freezing, and the air close to the water cold. Even in the summer, we had to bundle up with wet-gear, fleeces, and life jackets (I was told the life jackets were necessary for insurance purposes – so they could retrieve the bodies). The islands and intervening channels are also elongated north, so that wave set-up could change drastically any time there was a wind shift. We were caught out a few times with unfavourable seas, but there was always somewhere to shelter.
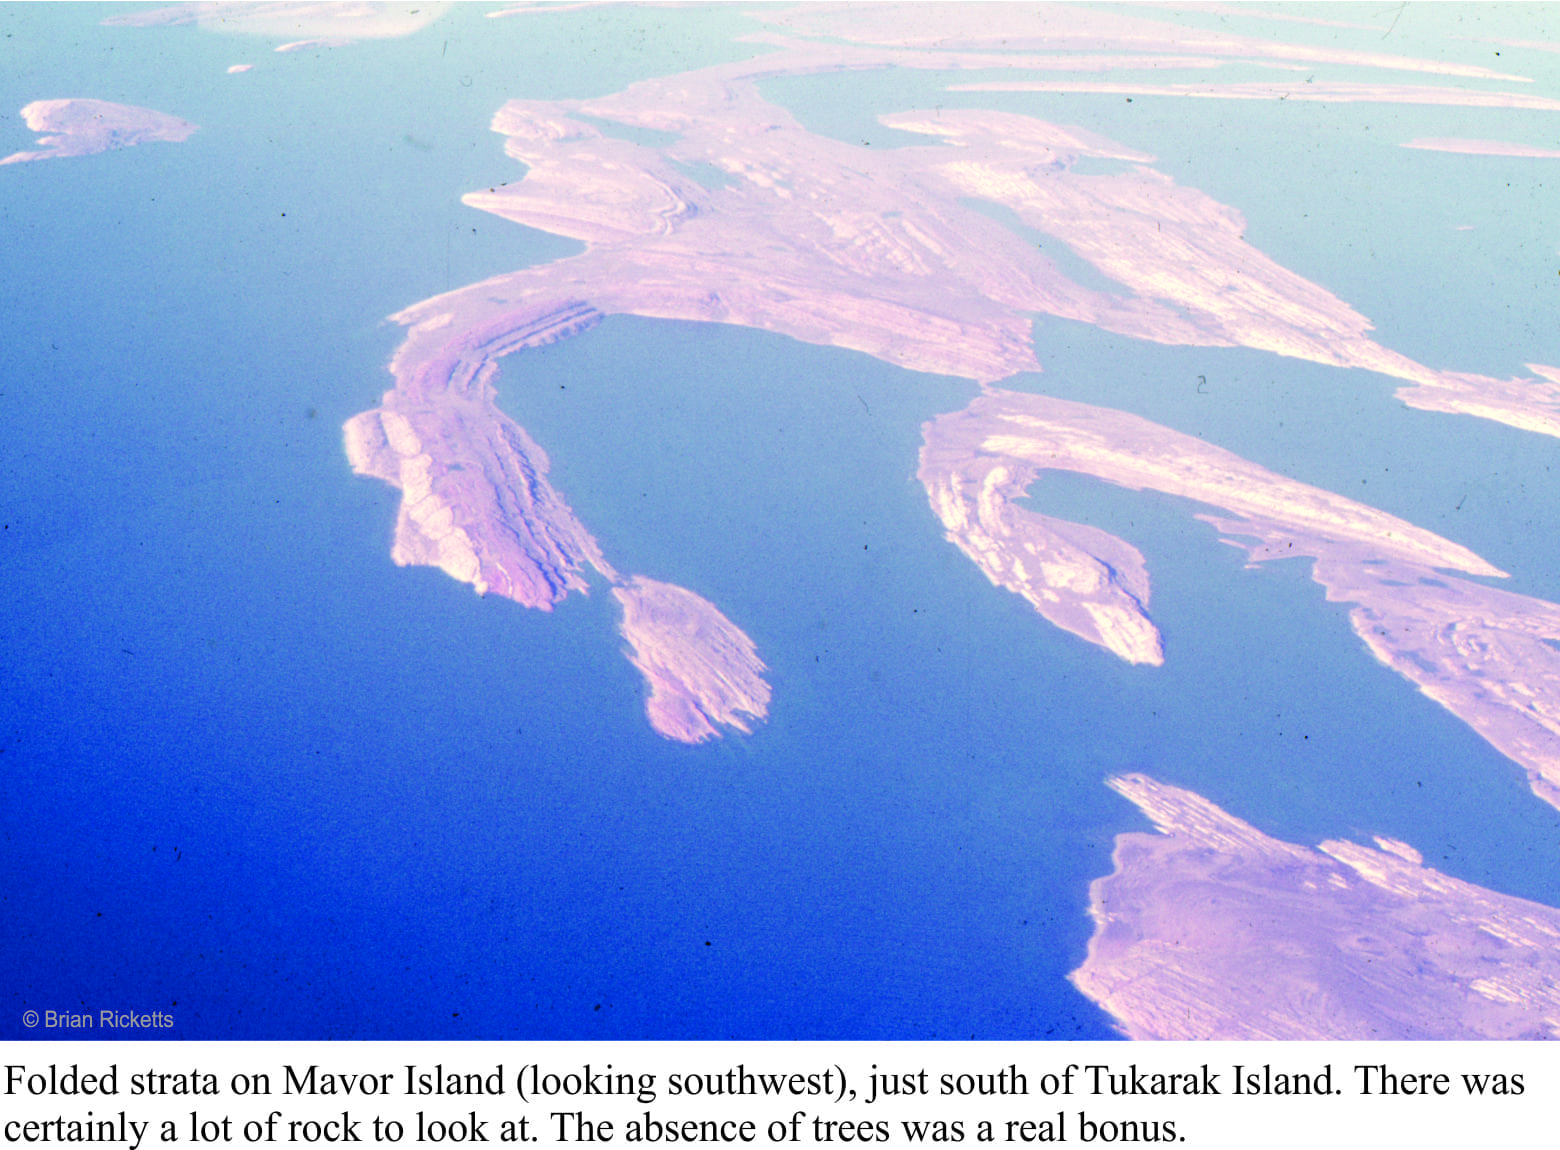
Belcher Islands are mostly held together by a thick volcanic unit that creates more or less linear coastlines. The strata were folded, like a series of waves, into simple anticlines and synclines, such that the package of sedimentary rocks is exposed in the anticlines, while the synclines are drowned by major channels and inlets. The terrain is subdued with low relief – the islands were scraped clean by the Laurentide Ice Sheet during the Last Glaciation.
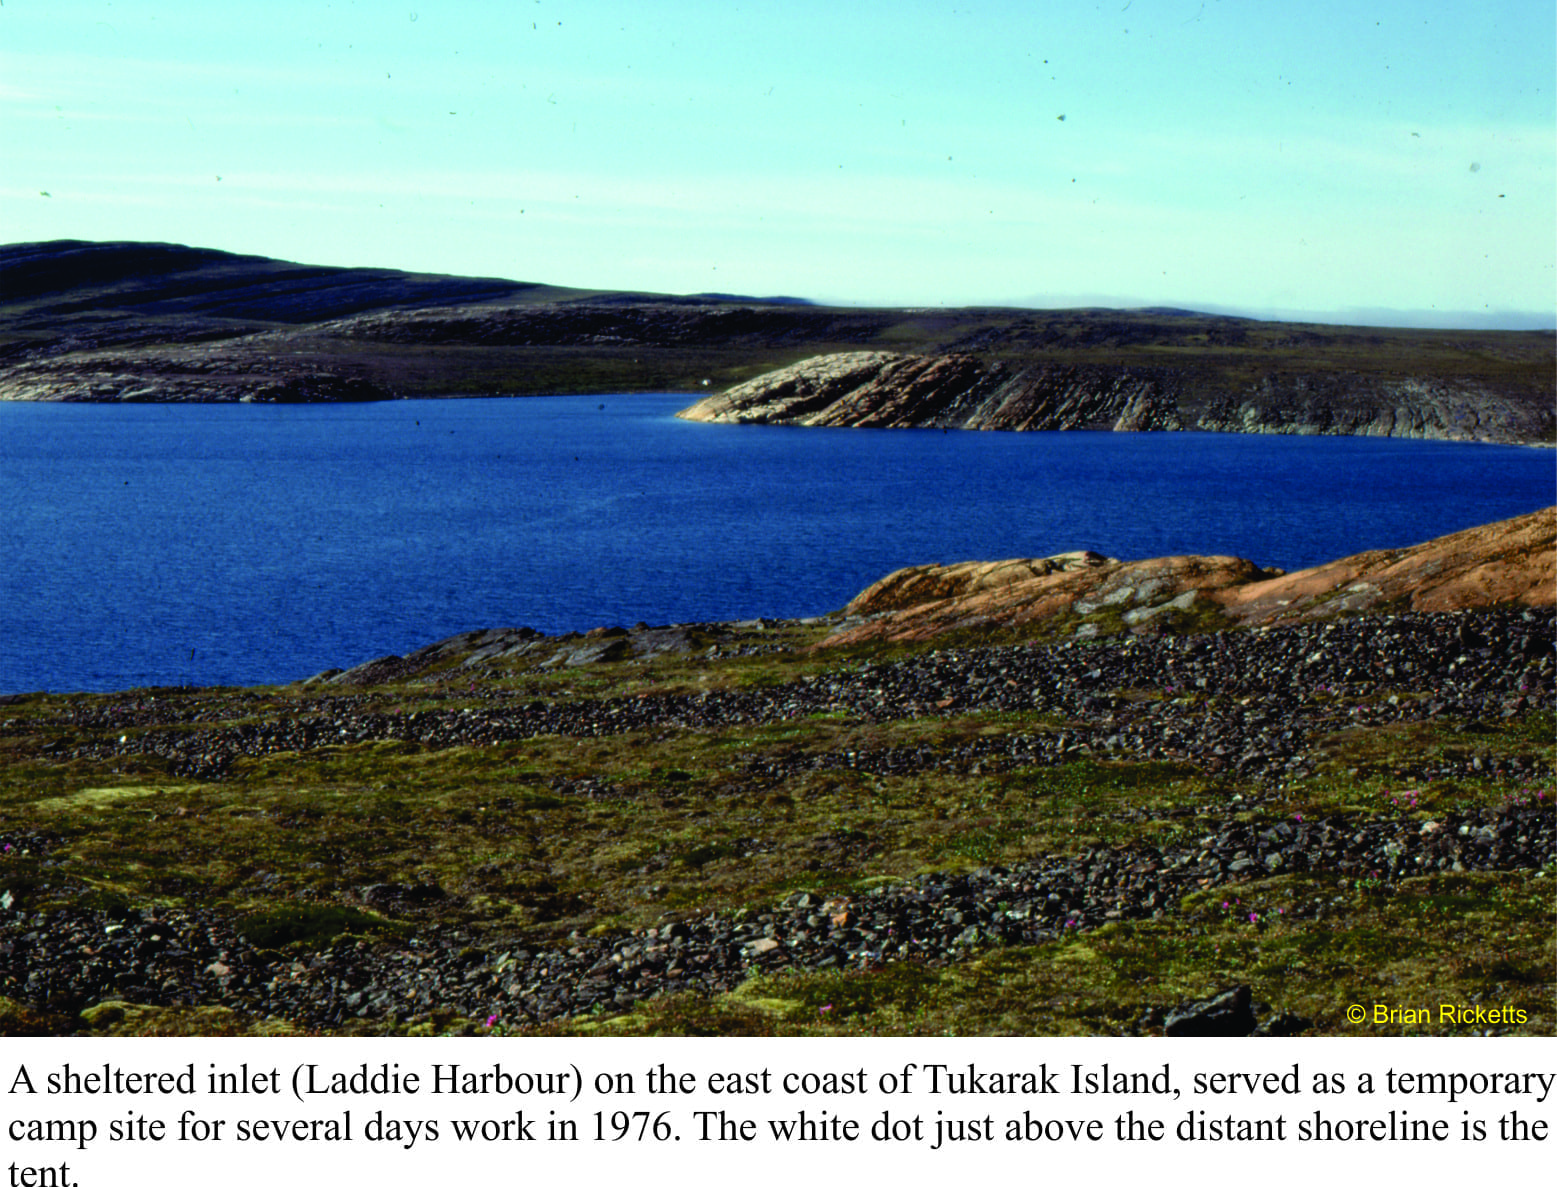
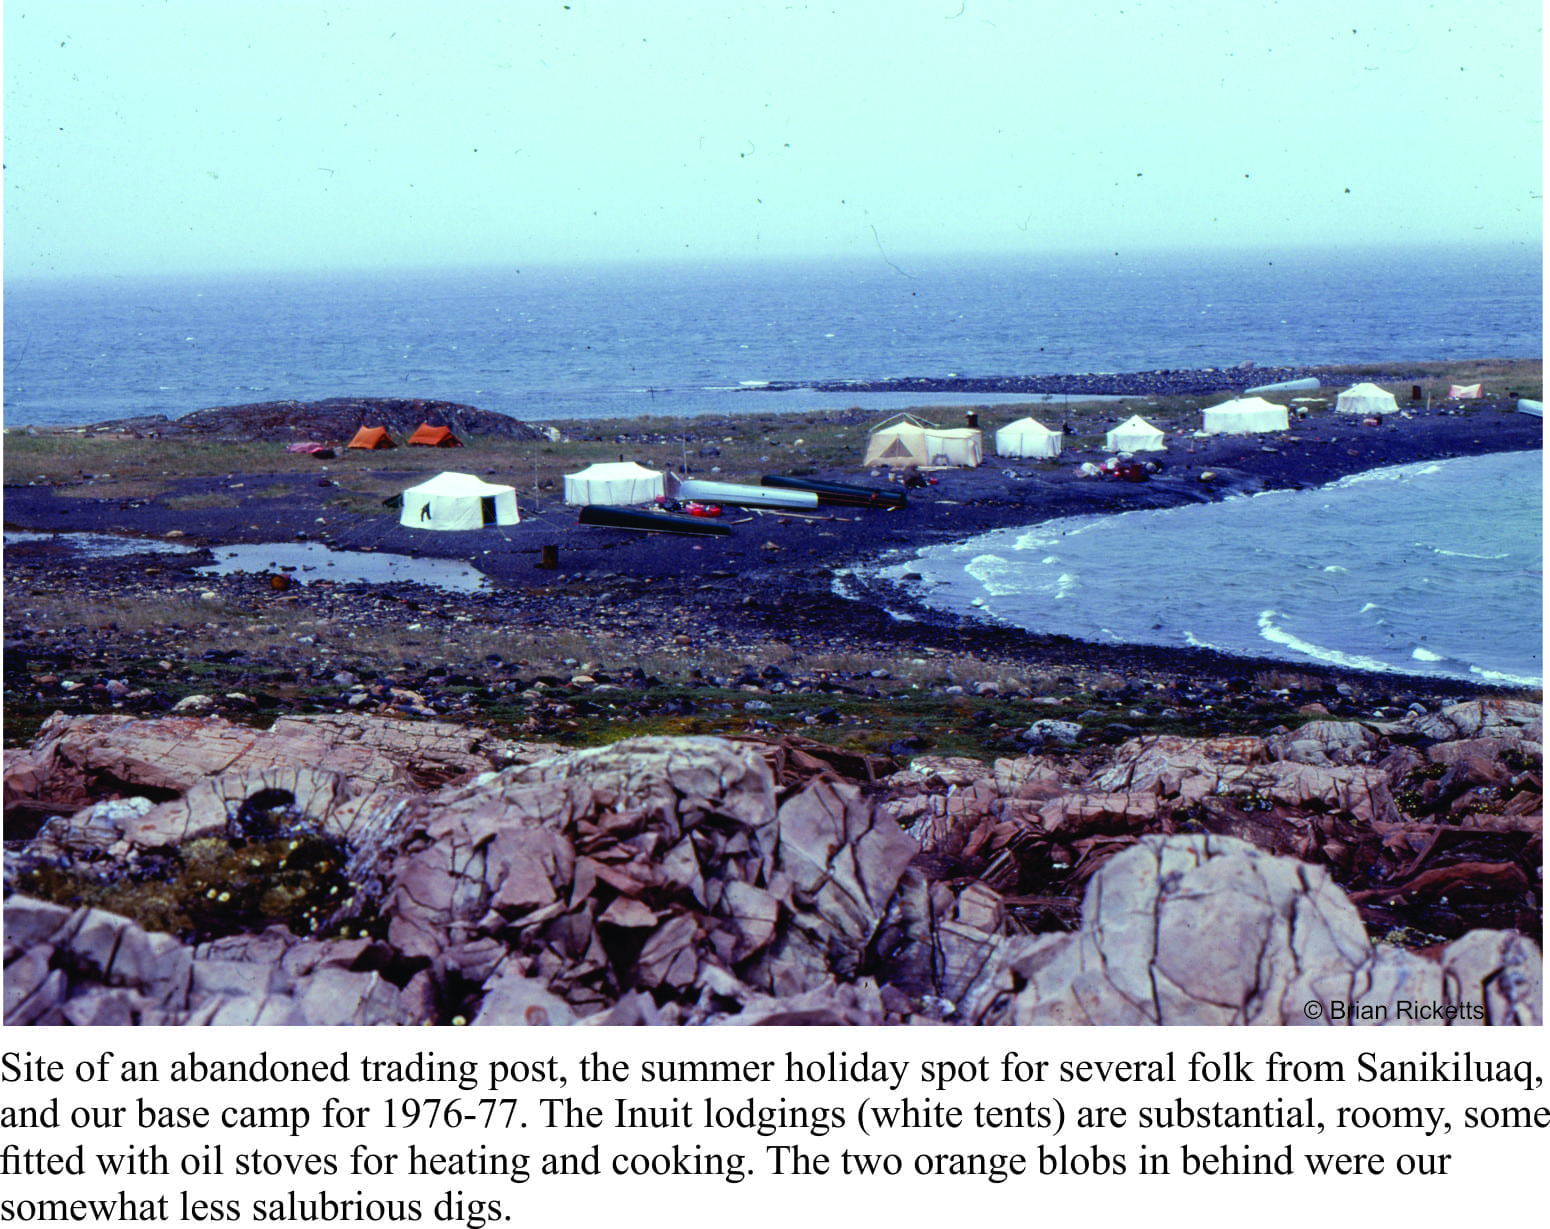
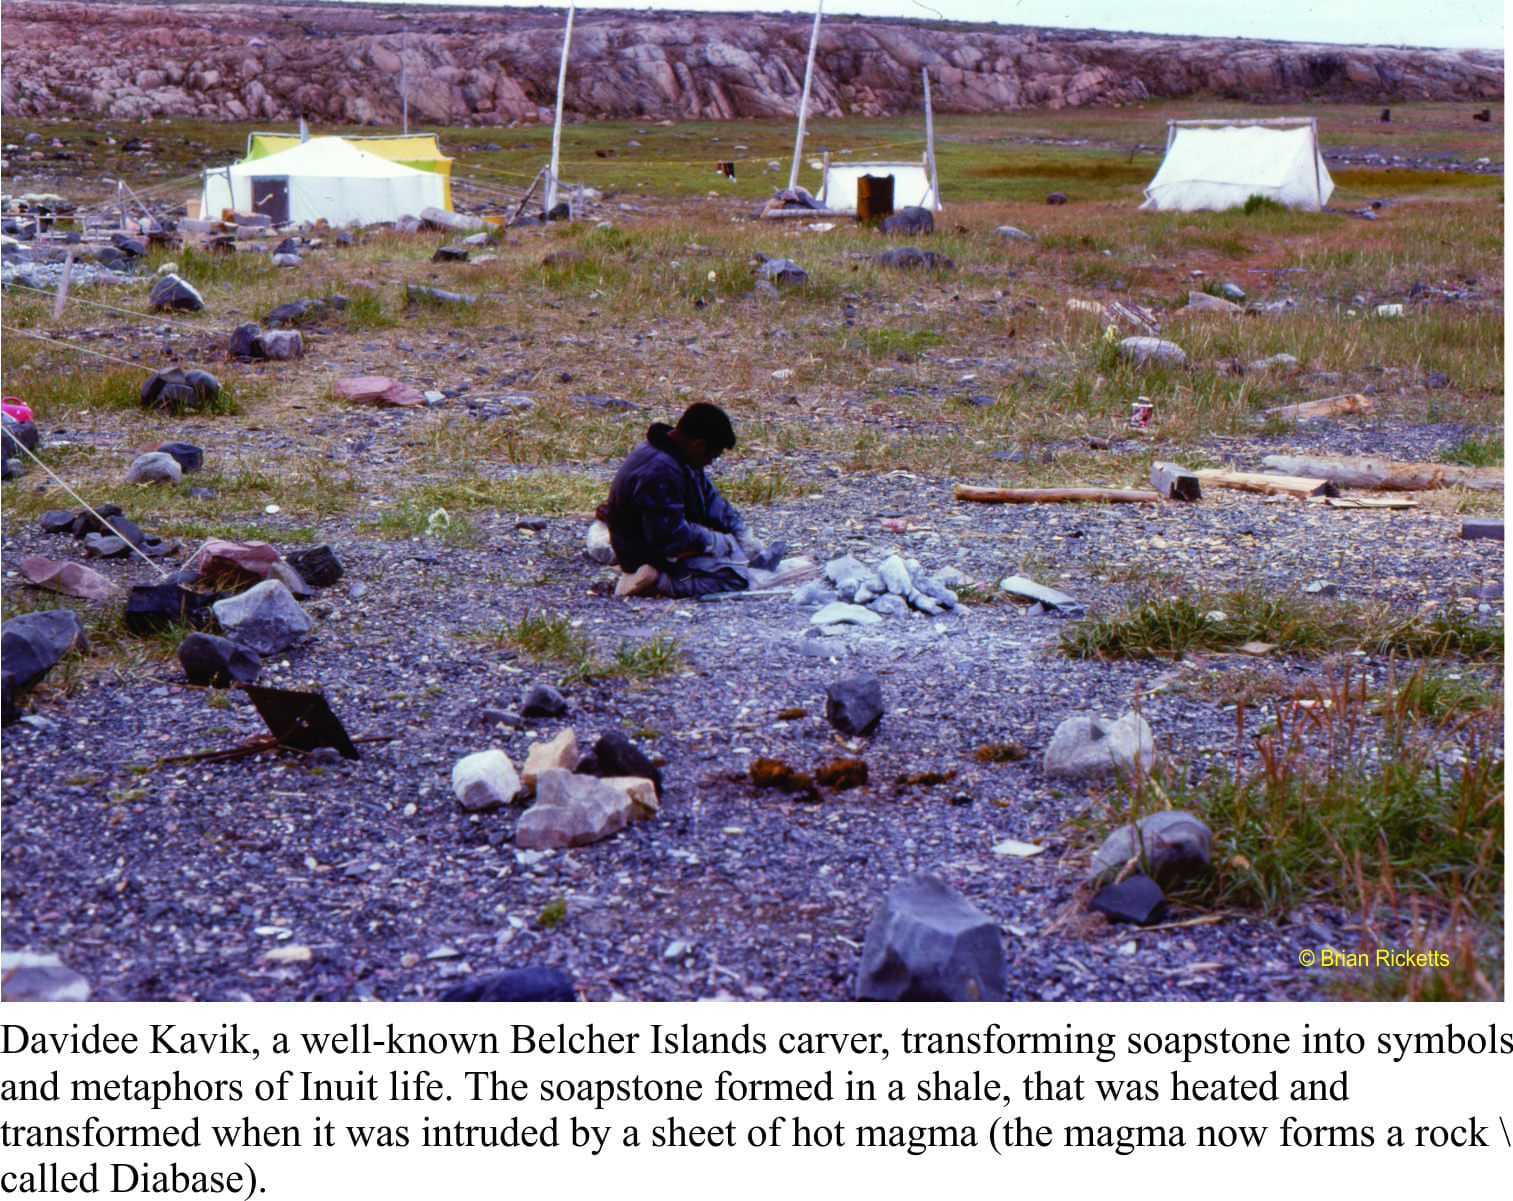
Our base camp was to be in a small, relatively sheltered inlet along the western shore of Tukurak Island (one of the largest and easternmost island). It was a 3-4 hour journey, depending on weather. This is the site of an abandoned Hudson’s Bay post. It was also the favoured summer holiday spot for local Inuit, primarily because it is close to their source of soapstone. Belcher Island soapstone has an enviable reputation amongst northern communities, because of its uniform, deep green colour, and general lack of fractures that would render carving difficult. Whenever we were in base camp, we would watch the elders carving, and teaching their younger folk the same skills. They would also bring us bannock and Arctic Char. And there was never a shortage of Inuit kids around, checking in, telling stories, or simply hanging out. We would spend 4-5 days away from base camp, returning to stock up and cache samples. Time in base camp was always a delight.
Belcher Islands sit well below the Arctic Circle at 56oN (latitude), and yet the landscape is typically Arctic. The northern Canada tree-line is located south of Hudson Bay, such that the Islands have a typical Arctic flora (especially wild flowers), and no trees – so much for my earlier, wistful image of the place.
The weather alternated between gorgeous, with light winds and clear skies, and abysmal. On more than one occasion we returned to camp from a day’s work to find tents down and sleeping bags soaked. High winds also prevented longer excursions with the boats, unless we were riding through sheltered channels and inlets. With the boats, there was always one eye kept on the weather.
During the first couple of weeks in 1976, Bill Morris (Geological Survey of Canada) had joined us to sample rocks for geophysical measurements (looking for ancient magnetic poles). The day he was to leave base camp (and fly out of Sanikiluaq) was particularly inclement. He insisted on attempting the trip, but instead of using our inflatable boats, I decided to rent one of the larger, sturdier, Inuit canoes with twin outboard motors (I was the only one with boating experience). We ventured out of the sheltered inlet, into the maelstrom – at least that’s what it looked like from the perspective of our small craft. I doubt we got any further than 50m from the inlet entrance; a lull in the waves, a quick decision to about-face, a beeline back to calmer waters, and the colour returned to the faces of my two passengers.
“Guess I’m going to miss my flight”. We all new he probably would have missed it, even if we had continued. Back to base camp to drain what was left of a bottle of scotch, and cogitate on an earlier field season on a warm New Zealand Pacific coast.
This is the first blog on my Belcher Islands episode